
In this post, Steph shows you some tricks so you can create your own easy autumn-themed doodles.
It’s the season of pumpkin spice everything and what better way to enjoy the season and de-stress than by getting cosy under your favourite blanket and doodling away? All you really need is a pen or a pencil and some paper to get started but for a bit more fun, you could use some crayons, colouring pencils or watercolours.
- How to Draw a Pumpkin in Six Easy Steps
- Drawing a Cute Little Ghost
- Fancy Cobweb Accents
- A Dormouse in Slumberland
- Simple Skulls
- Catherine Wheels
- Autumn-Themed Postcards
How to Draw a Pumpkin in Six Easy Steps
There are plenty of odd-looking pumpkins out there, so don’t worry if your pumpkin ends up looking a bit wonky. Mine certainly did!

First, draw a ‘C’ shape.
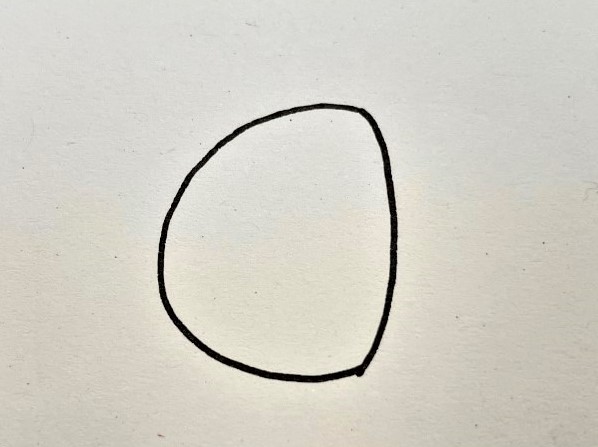
Close the ‘C’ shape with a less dramatically curved line, creating a sort of wonky semi-circle or dome tilted on its side.

Draw another ‘C’ shape connecting to and facing the last line you drew. You should end up with something that looks a bit like two mochi stuck together and tilted on their side.
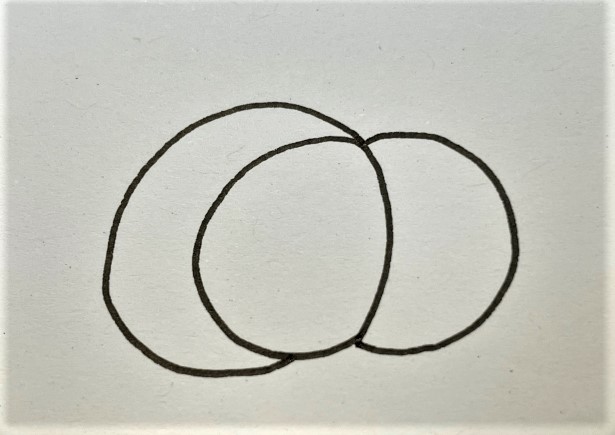
Next, draw another ‘C’ shape attached to the bottom and top of your first line/ ‘C’ shape. Once this line is complete, it should look a bit like a crescent moon attached to your wonky circle.

Do the same thing on the other side of your doodle.
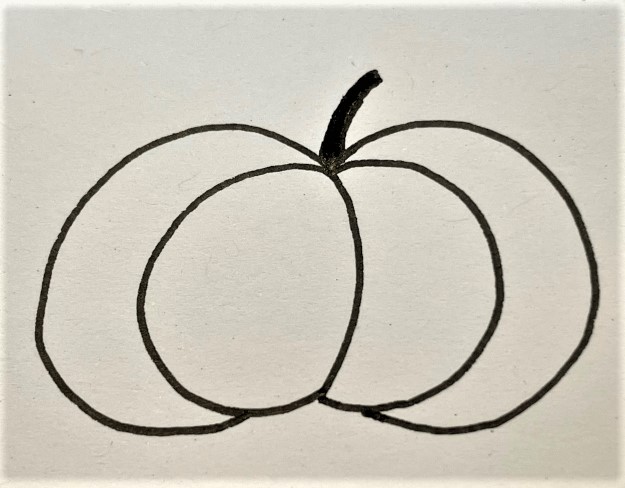
Now you just need to add a stem or peduncle.
Draw a small, thick curved line starting from the centre of the top of your pumpkin.
Your pumpkin is now complete!
Drawing a Cute Little Ghost
Spooky season wouldn’t be the same without a few ghosts!
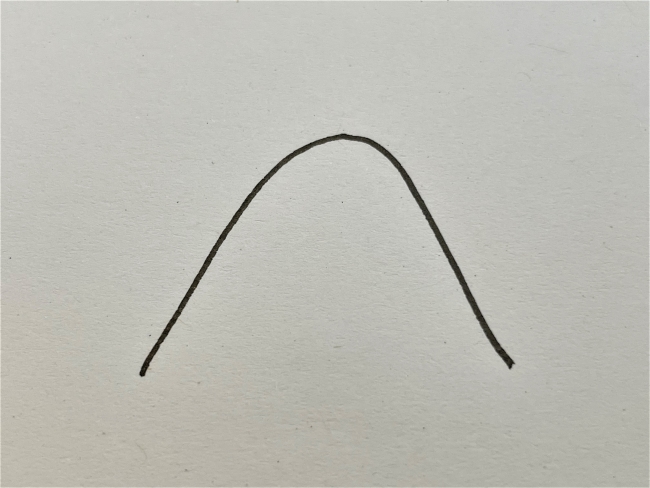
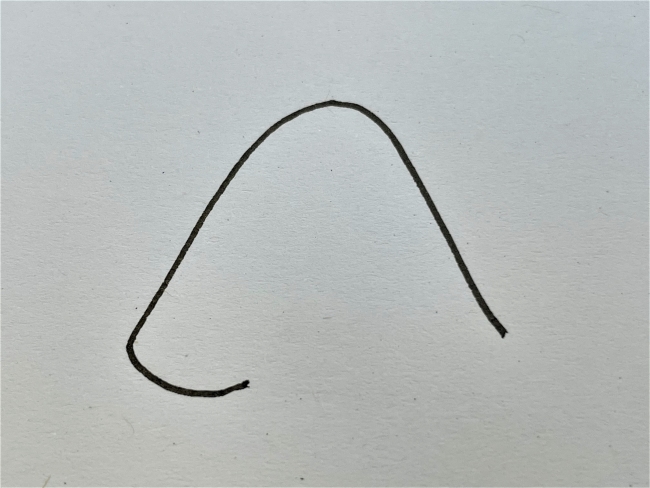
Draw an upside down ‘U’ shape with the two ends stretched wide apart.
Starting from the bottom of one side draw a curved line about a third of the way across towards the centre of the bottom of your inverted ‘U’ shape.
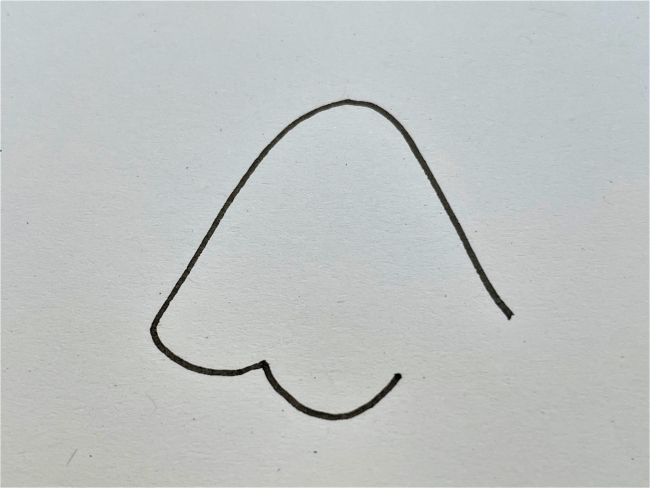
Beginning at the end of the line you just drew, which is not connected to one end of your ‘U’ shape, draw a line with a deeper curve to start to close off the bottom of the upside down ‘U’.
Starting at the open end of your shape, draw another curved line connected to the last line you drew. This should curve back up to close the upside down ‘U’ shape. The ‘body’ of your ghost is now complete.
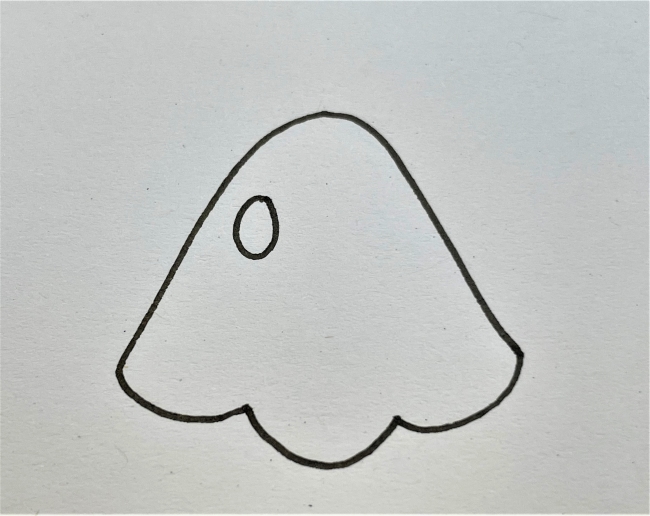

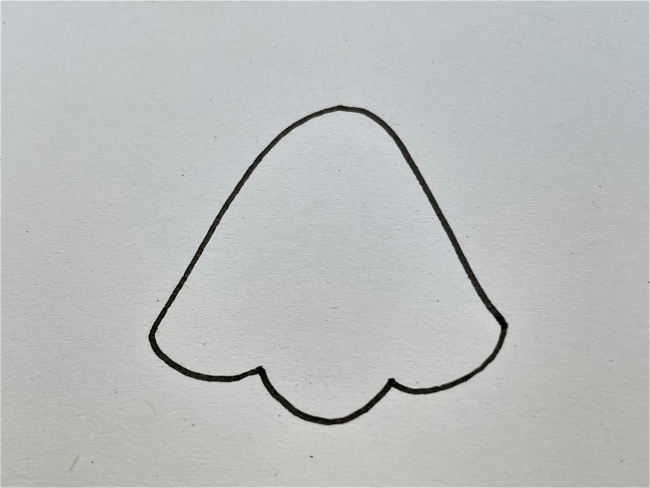
Draw two ovals for eyes.
If you want, you can add a little ‘V’ shape for a smiling mouth or an upside down ‘V’ to make your ghost look cross.
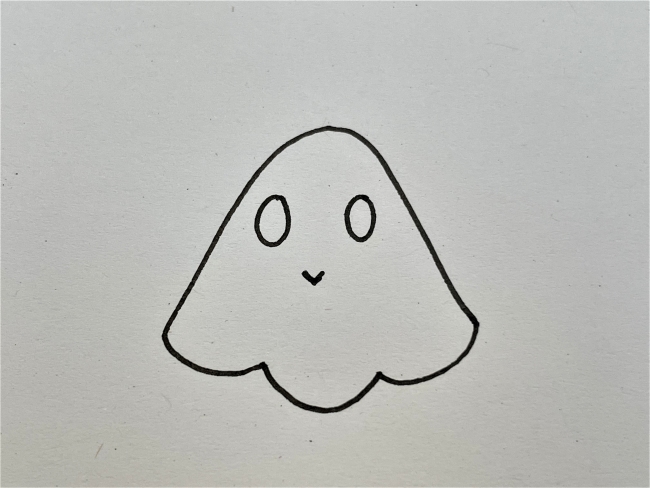

Your little ghost friend is now finished!
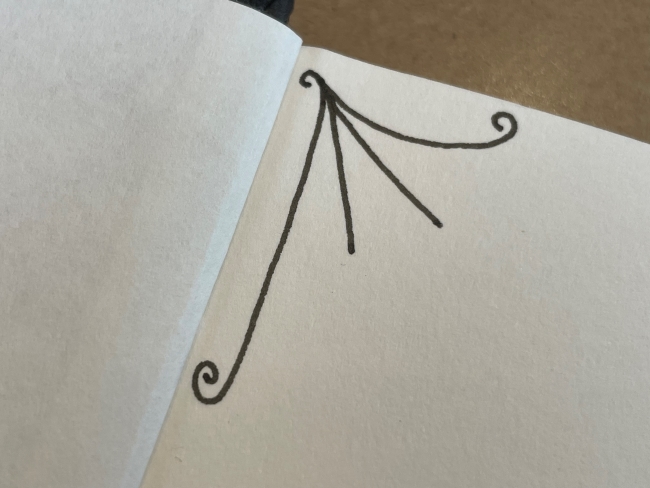
Fancy Cobweb Accents
This next doodle is a great way to add spooky details to the corners of pages. Why not add some to your journal this October?
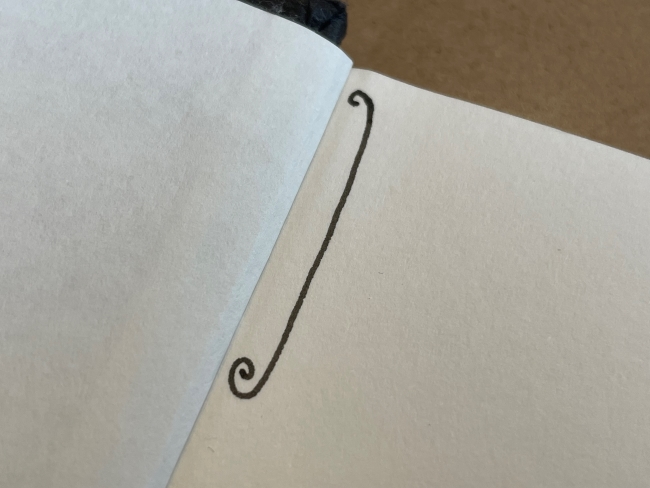
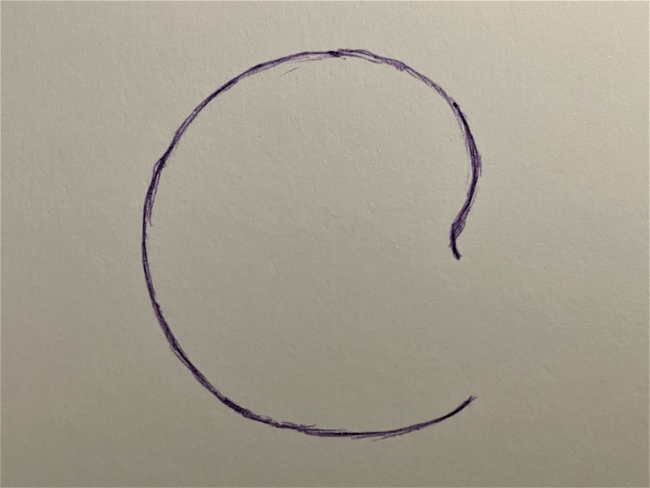
Draw a vertical line with a simple swirl detail at both ends.

Now draw a horizontal, slightly curved line attached to one of the ends of your vertical line.
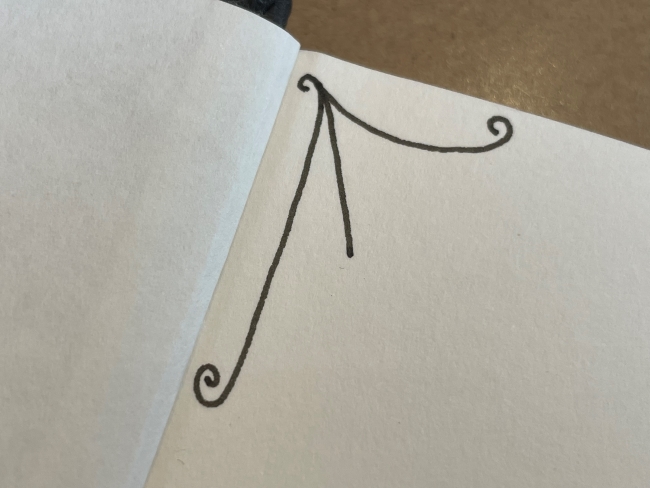
From the inner corner of your shape, draw a diagonal line extending downwards.
Draw another diagonal line from the inner corner, extending downwards at a slight angle from the line you just drew. This will be the frame for the horizontal curved lines that will complete your web accents.

Start to add your small, horizontal details. Draw little, downward facing curved lines in between the inner and outer lines of the frame you just drew.

You should have three of these downward facing lines in a row.

You can have as many rows of these lines as you like
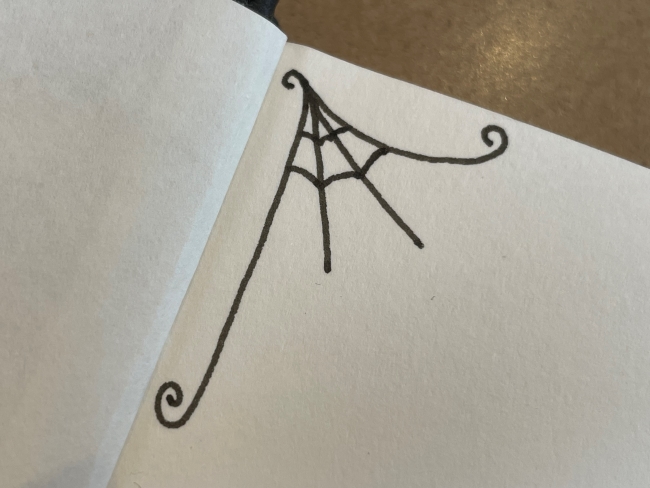
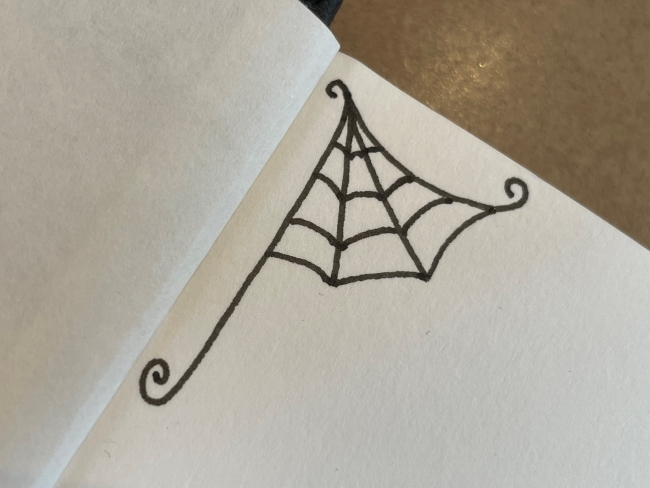
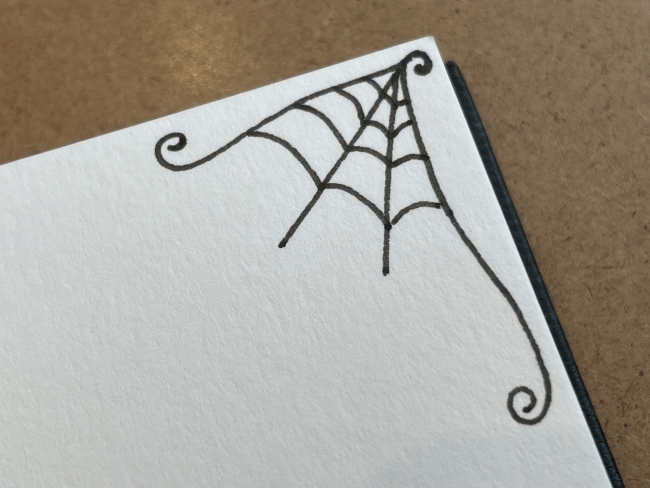
Why not add web accents to each corner to frame your doodles or writing?
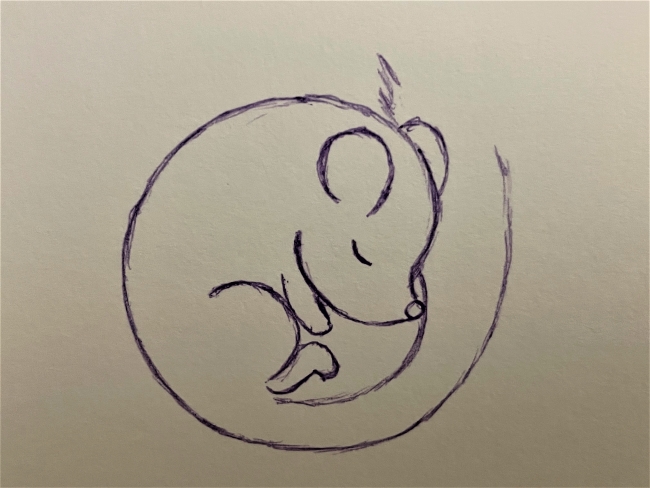
A Dormouse in Slumberland
The hazel dormouse, Britain’s native species of dormouse, goes into hibernation around October and November with the arrival of the first frosts. Britain’s other hibernating mammals, the hedgehog and various species of bat, also do the same.
Few things are more adorable than a dormouse curled up in a deep slumber, so we thought this simple method for doodling a sleeping dormouse would be a cute addition to your autumn doodles.
First, draw a ‘C’ shape with the top line ending in what looks a bit like an incomplete question mark. This will become the top of the head, the back and part of the tail of your dormouse.
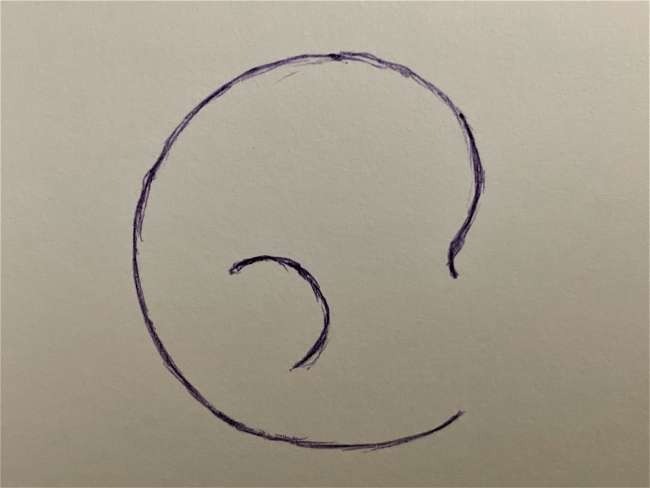
Draw a smaller curved line or downward facing ‘C’ inside your first shape, toward the bottom and facing the inside of the curve of your first shape. This smaller line will be the curve of the back leg of your dormouse.

Now add a little upside down, lowercase ‘r’ shape, like a bubble letter ‘r’, fixed to the bottom of the line you just drew. This is the back foot of your dormouse.
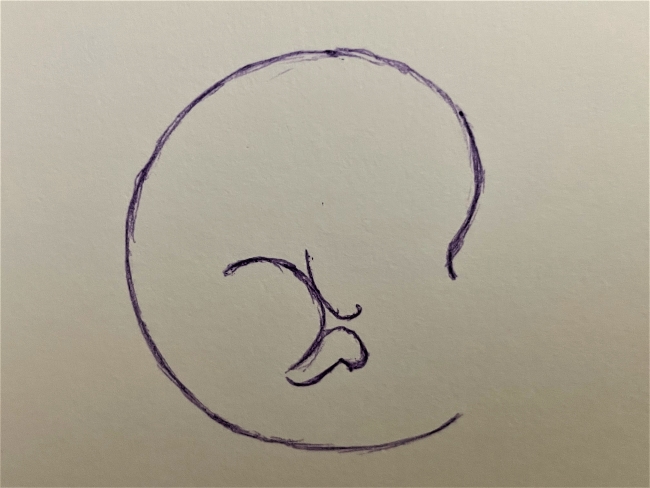
Draw a lowercase curved ‘l’ next to the hip of your dormouse. This will be part of the forelimb of your dormouse.
Now draw an ( shape titled on its side and connected to the oddly shape end of the first, large shape that you drew. This new line should be just above the forelimb and forms the shape of the bottom jaw/ face of your dormouse.
Once you have the face, you can finish the forelimb off by drawing a line upwards towards the cheek, starting from the curved bottom of the lowercase ‘l’ shape which forms the first part of the forelimb.
Next, add a little nose to the face.
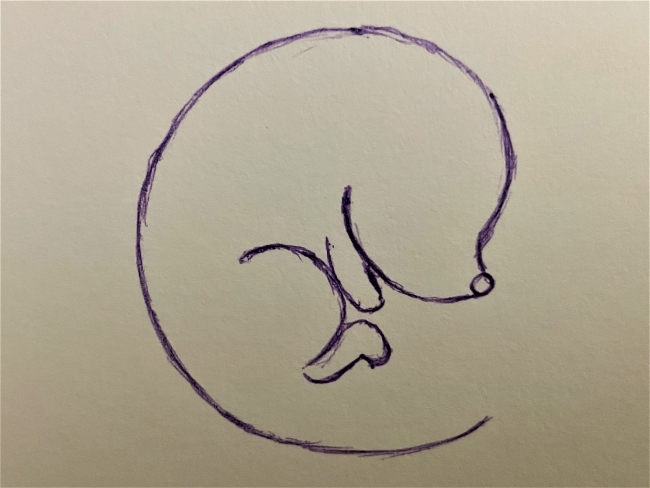
You can add the first ear to the dormouse (on the side not concealed by the face) by drawing an upside down horseshoe shape close to the top curve of the large outside line (the first line you drew.)
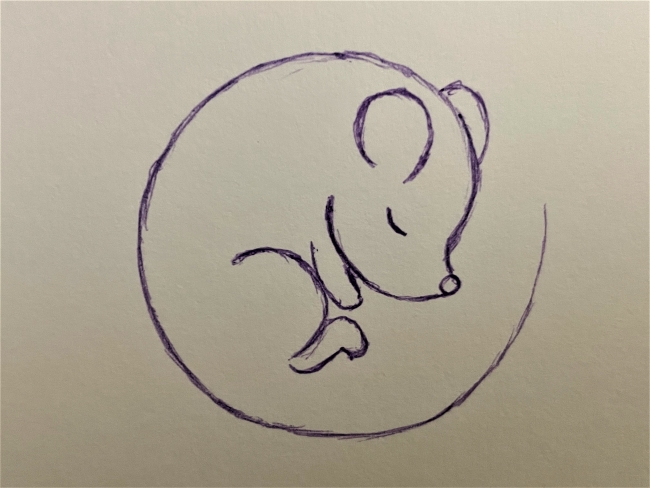
Add a closed eye by drawing a small, curved ( shape pointing towards the top of the head.
Add the outline of another ear by drawing a wonky semi-circle on top of the head, in line with the other ear.
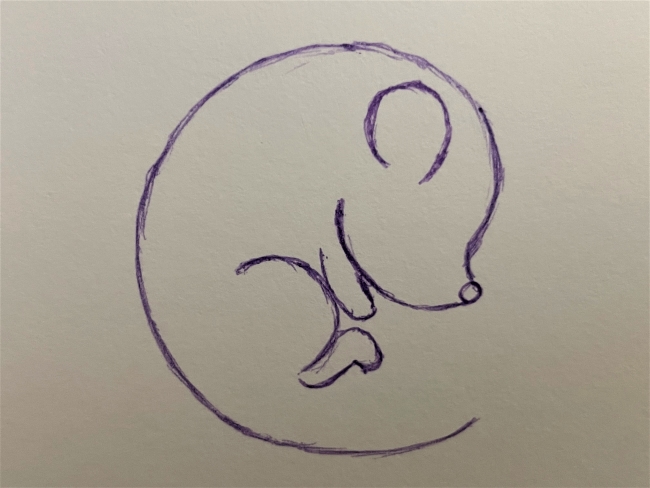
Start extending the bottom of the first, large line from the start of your dormouse doodle by bringing that bottom curved up and past the face. This will be the tail.

Add another curved line just below the bottom of the bottom foot of the dormouse. This should reach up towards the tip of the nose, with a small bit of distance between this line and the nose.
Continue extending the outer and inner lines which will form the tail until the inner line reaches the brow of the dormouse and the outer line of the tail reaches the same level as the ear largely obscured by the face.
Just above that ear, start creating a fuzzy end to the tail by lightly moving your pen and pencil up and down to create something that looks a bit like fur.
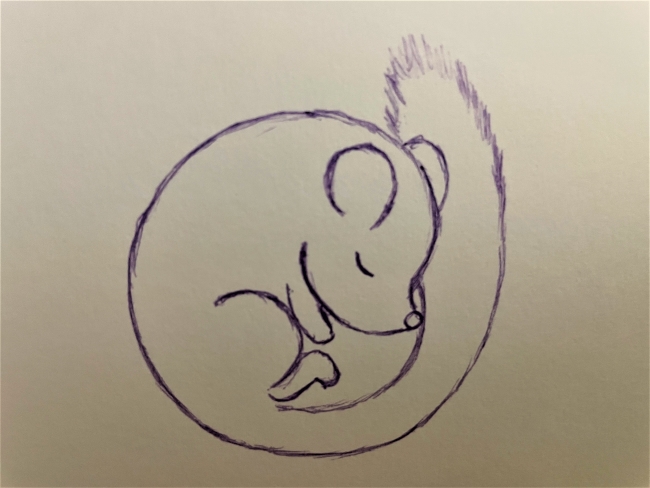
Continue creating a fuzzy end to the tail. Your dormouse is now finished.

If you want, you can give your dormouse friend a little nut or seed to curl his sleeping body around.
Simple Skulls
These little skulls will be a fun addition to your autumn doodles, especially if you like all things creepy cute!
Draw an incomplete circle.
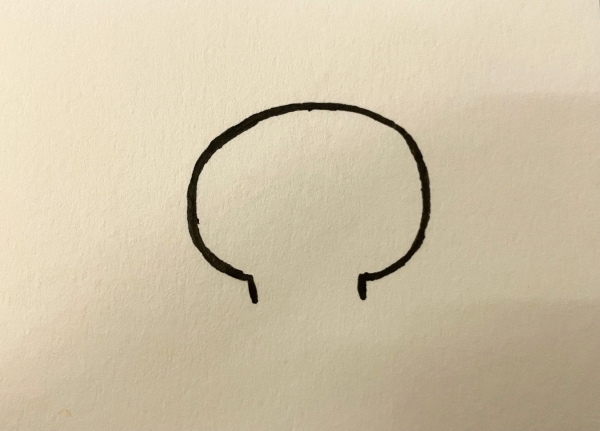
At the opening of your incomplete circle, draw a vertical line extending downwards from each end of the circle. You should end up with what looks like an incomplete button mushroom.

Now add the line that will complete the bottom of your skull. This line is a slightly curved, horizontal line starting at the bottom of one of the vertical lines you just drew and extending toward the bottom of the other vertical line.
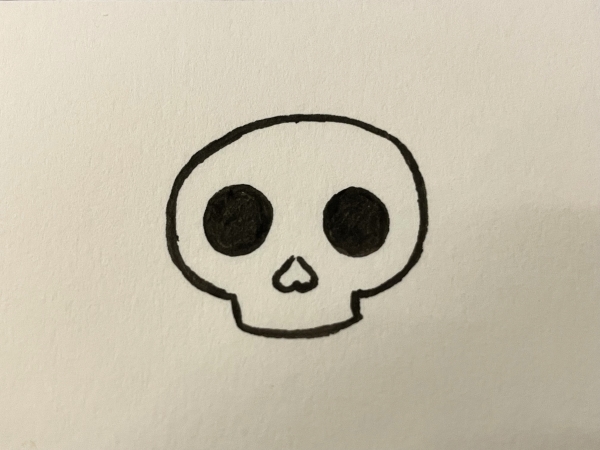
Add two circles for eyes and colour them in.
Add an upside down heart shape for a nose and colour that in.
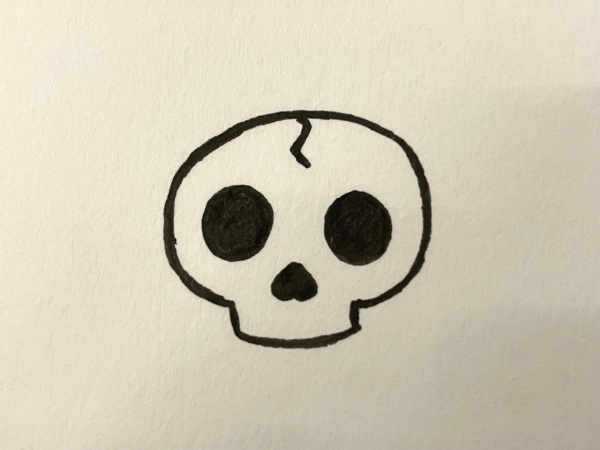
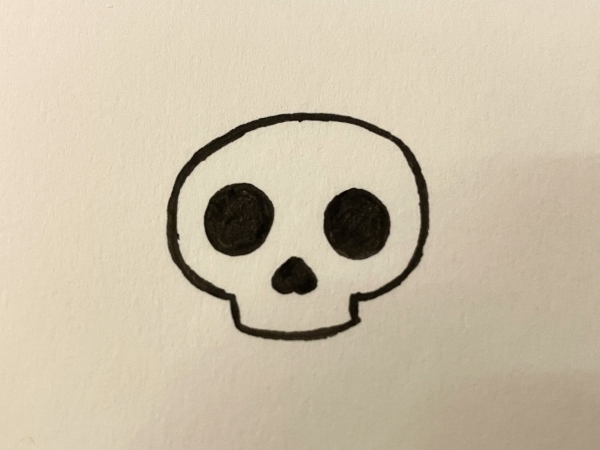
You can add other details to your skull, such as ‘cracks’ in the bones to make the skull look a bit ancient or leave it as it is.
Catherine Wheels
Here in Britain, the autumn fun doesn’t end with Halloween. Until recently, many people arguably made more of a fuss about Bonfire Night than Halloween- although it’s not until you try to explain its significance to someone from another country that you realise it’s a bit of a harder sell than Halloween…
Remember, remember
The fifth of November
Gunpowder, Treason and Plot
I see no reason
Why Gunpowder treason
Should ever be forgot
Bonfire Night, also known as Guy Fawkes Night, is celebrated here every 5th November and has been celebrated in various ways since the early 17th century after the foiling of the Gunpowder Plot in 1605 and the passing of ‘An Act for a Public Thanksgiving to Almighty God every Year on the Fifth Day of November. [Thanksgiving Act].’ This act involved special church services. The Gunpowder Plot was hatched by a small group of Catholics, most of whom were members of the gentry, with Guy Fawkes (a former soldier) serving as the man in charge of making things go ‘boom.’ Despite Robert Catesby being the main instigator of the plot, it’s Guy Fawkes whose name has become synonymous with the 5th November.
The 5th November has been celebrated in various ways throughout the centuries, with some traditions perhaps on the wane and others appearing to have gone the way of the dodo over the years. These days, some celebrations forgo the practice having an effigy of Guy Fawkes tied to a stake at the middle of the pile of wood that will become the bonfire. Fireworks, however, remain an important fixture of the celebration with many councils putting on firework displays in early November so people can celebrate safely. There are also sweets such as bonfire toffee and bonfire lollies, which both have treacle as a key ingredient and pop up in stores around this time of year.
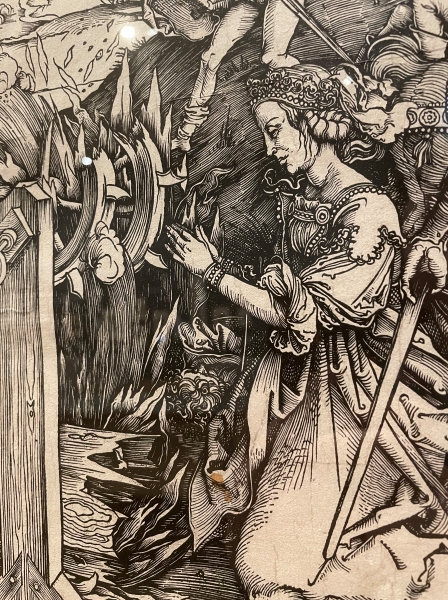
One of the most beautiful fireworks you might see during Bonfire Night celebrations is known as the Catherine Wheel. It gets its name from the story of St Catherine, or Catherine of Alexandria, and the spiked wheel used to torture her. We’re not going to draw the story of her martyrdom, although if you wish to see a depiction of her story you can do so in the Albrecht Dürer’s Material World exhibition. We had something a bit more lighthearted in mind. Keep reading to find out how to create your own easy Catherine Wheel doodles.
Type A:
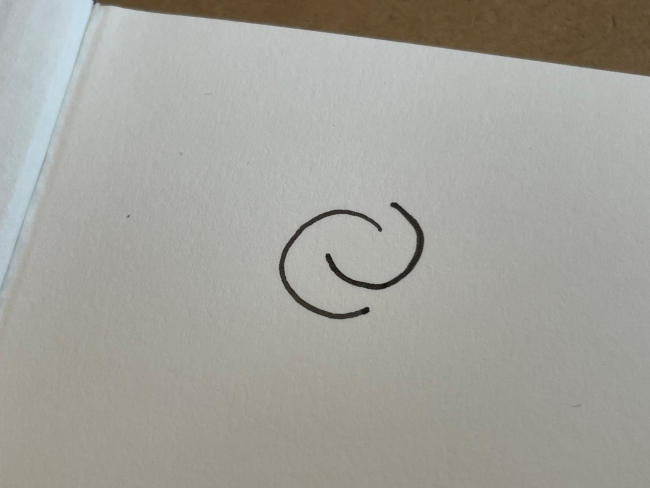
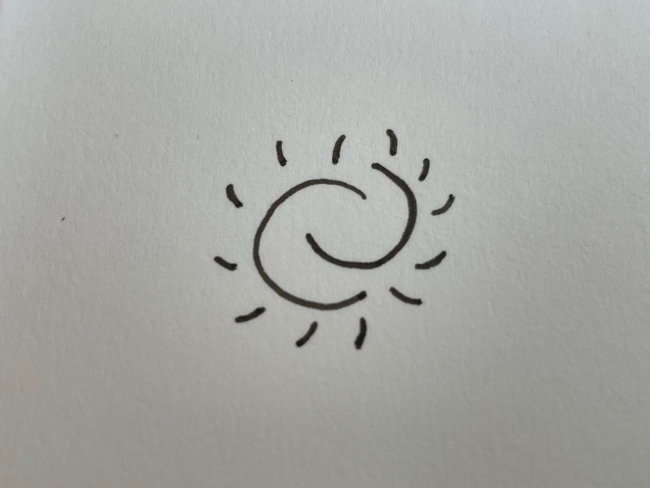
Draw two ‘C’ shapes- one upright and one starting in the space within your first ‘C’ and curving around it.

Draw tiny, vertical lines a small distance apart and all around your ‘C’ shapes.
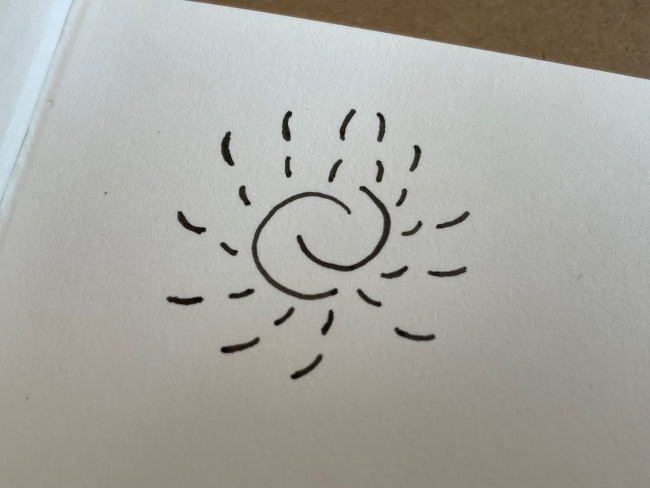
Draw another set of small, vertical lines above the ring of lines you just drew. Why not use a different colour for these lines?
Draw as many rings of these vertical lines in as many colours as you like until you are happy with your Catherine wheel.
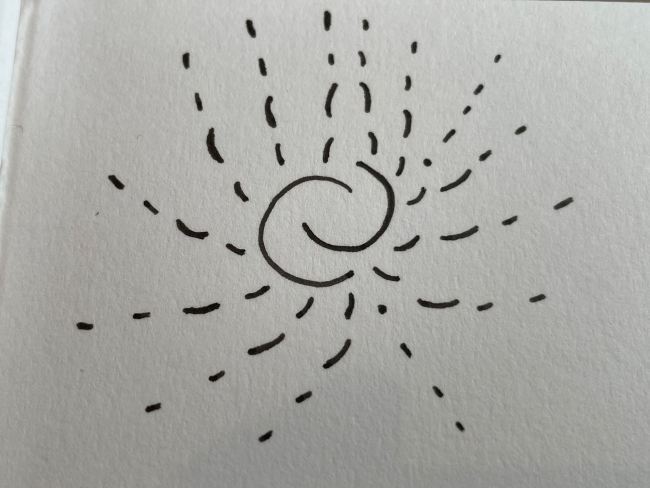
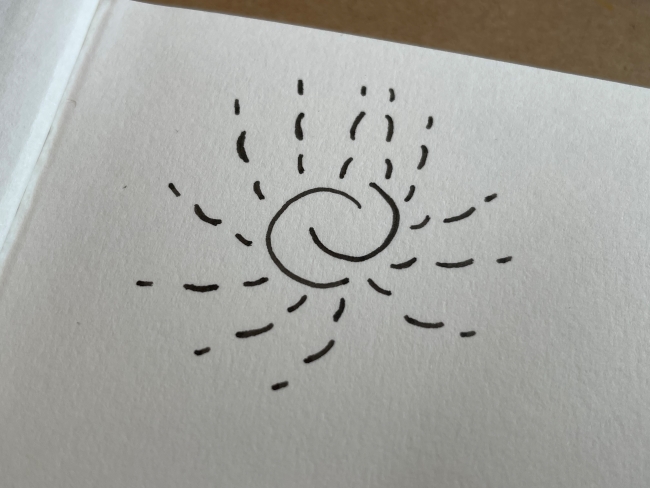
Type B:

Draw a simple, loose swirl shape. You’ll want to draw it with enough space to be able to add details inside the swirl.
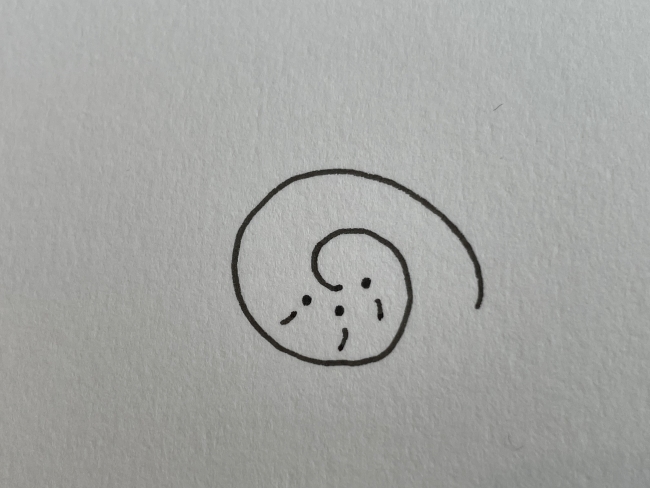
Draw a series of dots with small, vertically curved lines above them. These dots and lines should start close to the centre of the swirl and follow the inside line of the swirl. Continue the pattern up to the opening of the swirl.
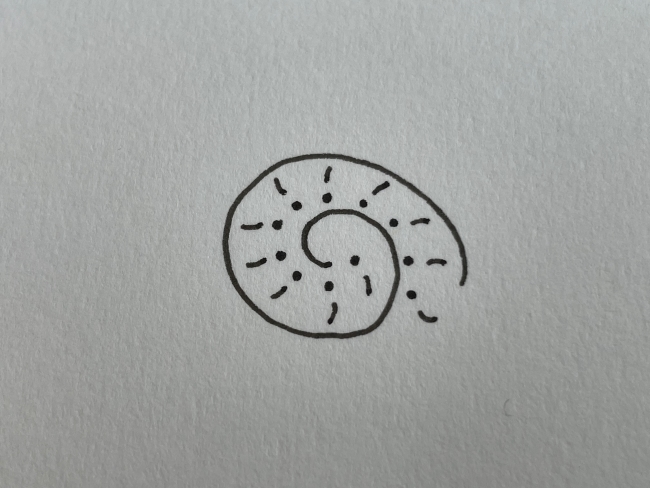
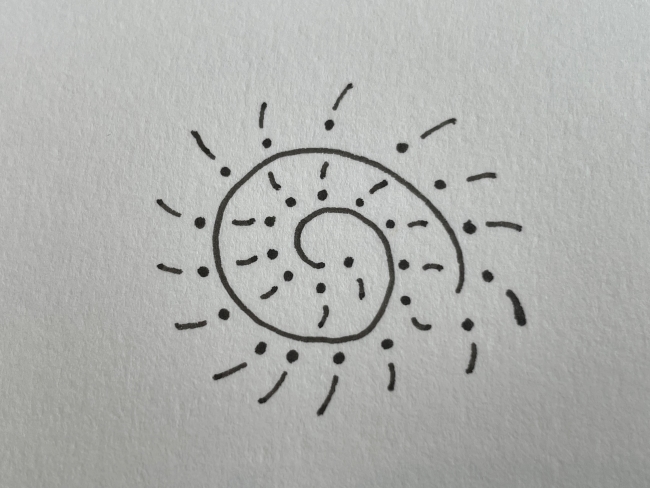
Start another series of dots and small, vertical curved lines going around the outer line of the swirl. Why not draw these in a different colour?
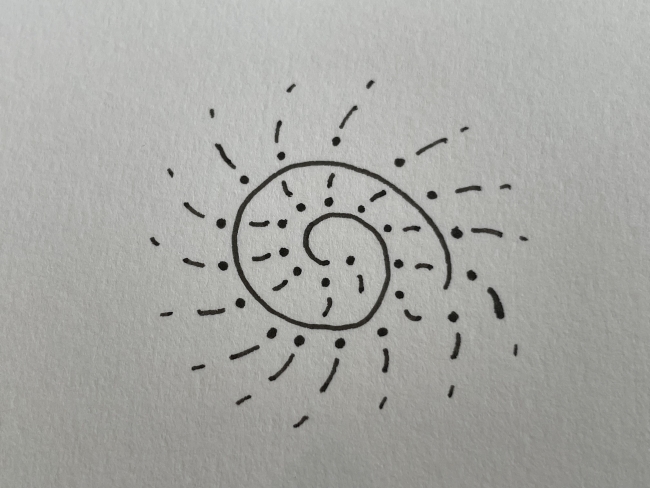
Draw a ring of smaller, vertical curved lines around the vertical lines you just drew. You could use another colour here, too, if you want.
You can stop with this ring of lines or continue as long as you like until you feel that your Catherine wheel is complete.
Autumn-Themed Postcards
Back in March, we bid a reluctant goodbye to the Althea McNish: Colour is Mine exhibition. Althea’s textiles filled the gallery with colour and warmth during the chilly days from late autumn 2022 to early spring this year. Many of her designs transformed England’s native flora into plants with a more tropical feel. Althea also incorporated fruits and vegetables into some of her designs and one of her designs rendered onions almost unrecognisable through her beautiful use of colour.
Some of the drawings Althea produced in crayon and ink when creating different designs were particularly interesting to me. The designs reminded me of being allowed to use and experiment with a random assortment of craft materials as children in primary school.
Why not try mixing different materials to create your own autumn pictures and postcards? It’s great fun! You could also add little doodles to a bullet journal.

This pumpkin patch was drawn in colouring pencils, with watercolours painted over the pumpkins.

This Halloween postcard was made using Sakura Pigma Micron drawing pens, which have water resistant ink, as well as watercolour paints and pencils.
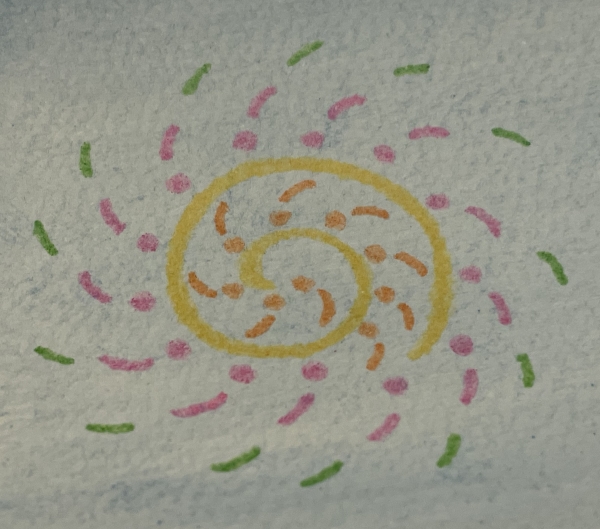
The Catherine wheel above was drawn using coloured pencils and the background was filled in with some cheap watercolour paints.
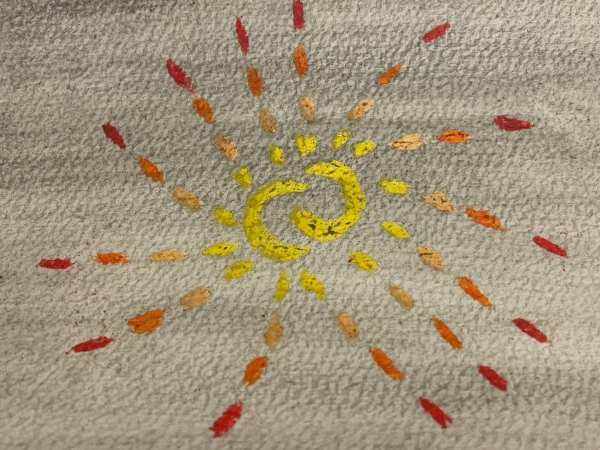
The Catherine wheel below was drawn in wax crayon before the background was filled in with watercolour paint. You can see that the wax crayon shows up brighter against the background. Any slight spaces between the wax are filled with watercolour paint.
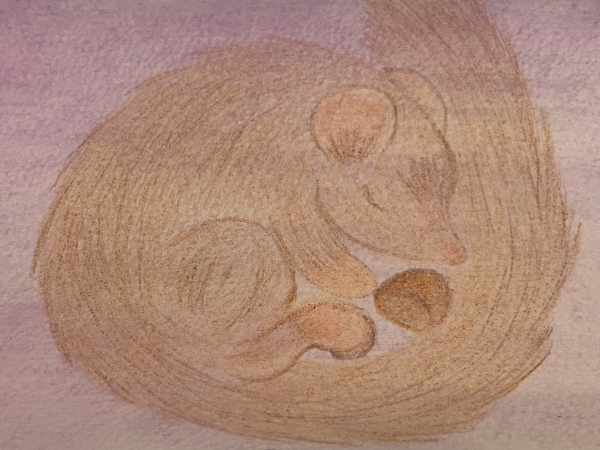
This dormouse was drawn using multiple layers of colouring pencil.
Whatever you doodle, I hope you have fun being creative. Have a Happy Halloween and a great Bonfire Night!
Further Reading
