
Keep someone’s fingers safe as they enjoy a hot drink this winter with this easy crochet coffee cup cosy pattern by Steph.

Although I like switching off a bit as I crochet a scarf and I enjoy making something I can pick up and put down again as I please, it doesn’t quite give me the same amount of gratification as holding a smaller project that I have been able to complete fairly quickly when I’m hoping to make gifts for multiple people. This is specially true when an idea comes to me just before birthdays and Christmas. This project combines the pleasure of not having to worry too much about what you’re doing with the satisfaction of knowing that your gift will probably be ready on time. After all, there’s enough to worry about as we get closer to Christmas!
With the amount of hot drinks people consume during the chillier months, people are bound to burn their fingers from time to time as they try to warm their digits whilst sipping away at a treat. So, this gift is a practical one and perfect for autumn and winter. You can match it to the season using autumnal or festive colours and/ or themed buttons as embellishments, or you could just use the recipient’s favourite colour or a neutral colour.
If you wanted to, you could probably adapt this pattern to create crochet face cloths, scarves and even a blanket (all you would have to do is change the number of chain stitches you start with to alter the width and stop crocheting once you are satisfied with the length.) I have written this pattern for the purpose of making a coffee cup cosy. The main stitch we will be using is often referred to as an ‘even moss stitch’, there is another ‘moss stitch’/ ‘linen stitch’ and an ‘Irish moss stitch’ in crochet too. Please note that I learned to crochet using US crochet terminology, so you may need to translate the pattern into British crochet terminology if you use that.
You will need:
- Cotton aran or worsted weight yarn. I used Yarn and Colours Epic cotton aran yarn in ___
- A 5mm / Size H crochet hook
- Scissors
- A tapestry or yarn needle
- Buttons (optional)
You can find abbreviated and unabbreviated versions of the pattern and a tutorial below.
Pattern (unabbreviated for beginners):
Slip knot
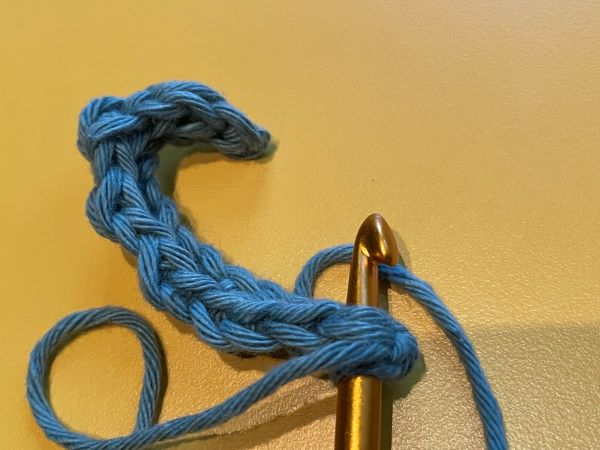
Chain a multiple of two. I chained 14.
Slip stitch into the second stitch from your hook (do not count the chain already on your hook)
Half double crochet into the next stitch.
Slip stitch, then half double crochet into the next stitch until the end of the row. You should end on a slip stitch into the loop of the slip knot at the start of your row of chains. Then chain 1 and turn your work.
Repeat: slip stitch, half double crochet. Chain 1 at the end of each row and turn your work. Continue this for 52 rows for a more traditional coffee cup shape, 49 rows for a slimmer cup or until the piece is the length you want it to be.
*The length does not have to be exact as the piece should have some stretch to it if you have kept your stitches fairly loose.
Pattern (abbreviated version):
Slip knot.
Ch 14.
Sl st into second st from hook.
Hdc into next st.
Sl st, hdc until end of row. End row on a sl st into the loop of the slip knot at the start of your row of chains. Ch1 and turn your work.
Repeat: sl st, hdc until end of row. Ch1, turn work. Continue for 52 rows for a more traditional coffee cup shape, 49 rows for a slimmer cup or until the piece is the length you want it to be.
*The length does not have to be exact as the piece should have some stretch to it if you have kept your stitches fairly loose.
Tutorial


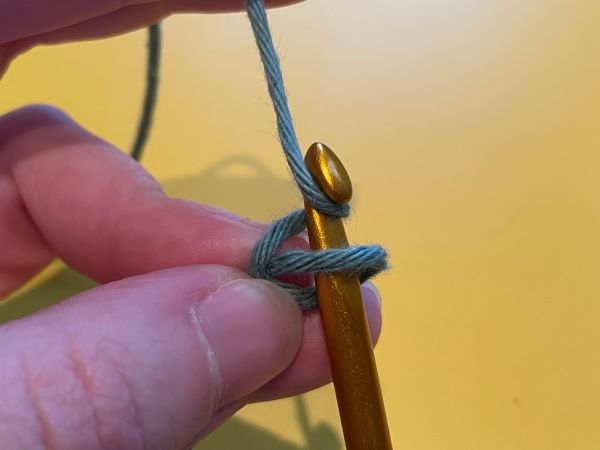
Start with a slip knot. There are various ways to do this but I make a loop of yarn pinched between my thumb and index finger on one hand and then pull the working (the long end closest to your skein of yarn, not the tail end) through the loop with my crochet hook, then pull another loop through the loop you have just pulled through and pull on the tail end to tighten the knot.
Remember to leave a tail long enough for sewing into the bottom of your piece.
Tip: Sometimes a strand of yarn will be missed as you pull up loops on your crochet hook. This is especially common with cotton yarn, as the strands tend to separate more easily. Simply tug on the working end of yarn to unravel any mistakes and start your stitch again.


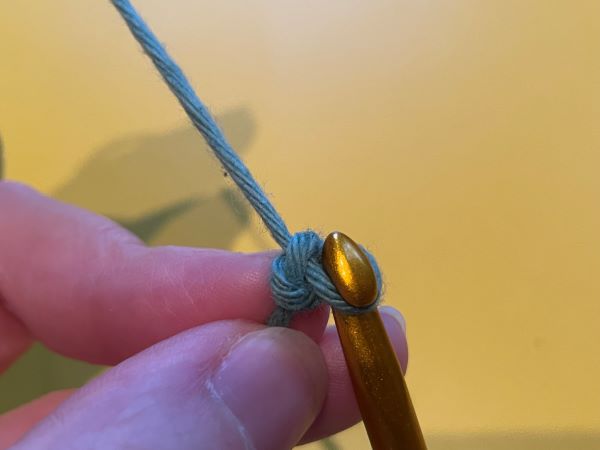
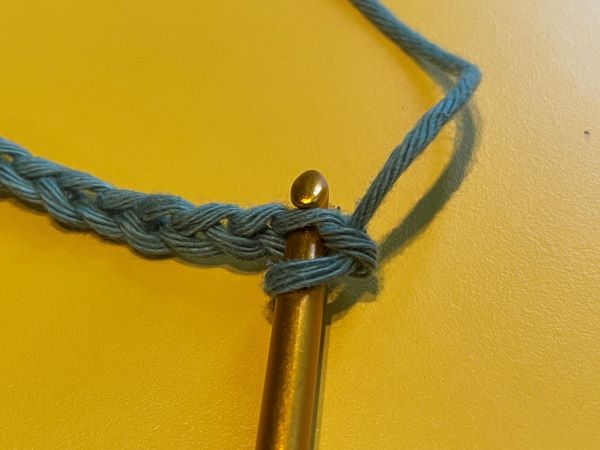
Now we’ll move on to chain stitches- which is basically the same to what you have already done through the loop pinched between your index finger and thumb. Simply slide your crochet hook into the centre/ loop of the slip knot and pull a loop of yarn through it. This is your first chain stitch!
Now pull a loop of working yarn through that chain stitch and you have your second chain stitch. Continue making chain stitches until you have 14 chain stitches.
Tip: Keep your stitches/ tension fairly loose- don’t pull them too tight! You’ll be stitching into these chains later.
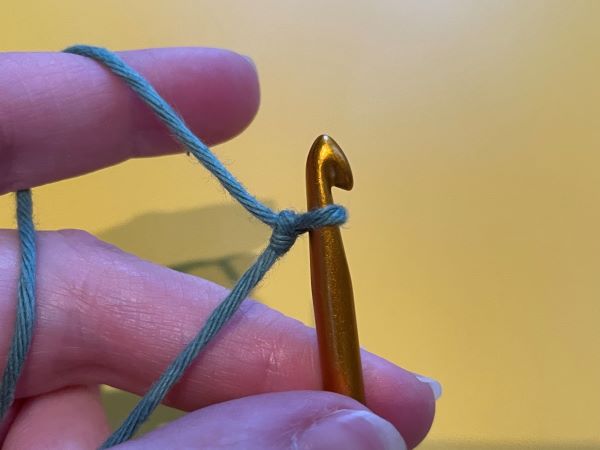
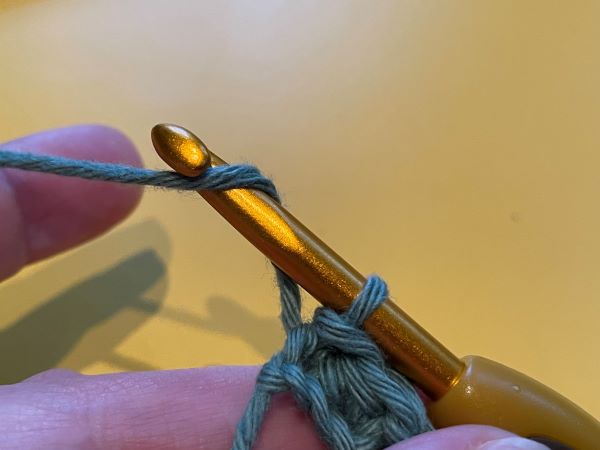
Next we’ll start our next row by doing a slip stitch into the second chain from your hook. This means that you don’t count the chain stitch still on the hook (your last chain stitch in the row of 14).


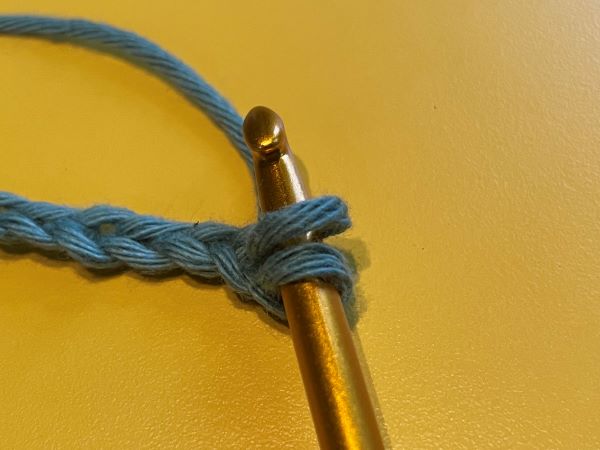

Doing a slip stitch is pretty similar to a chain stitch. Insert your crochet hook into the second chain stitch from the one on your hook, then pull a loop of working yarn through that chain. Now pull that loop through the chain stitch still on your hook (the 14th chain from your previous row) and you have completed your slip stitch. You should be left with one loop on your crochet hook.


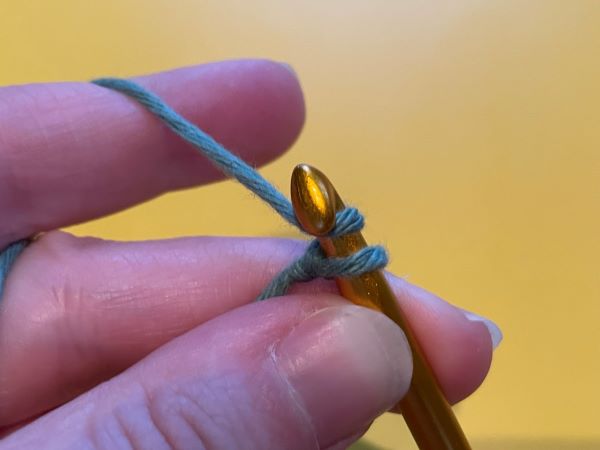
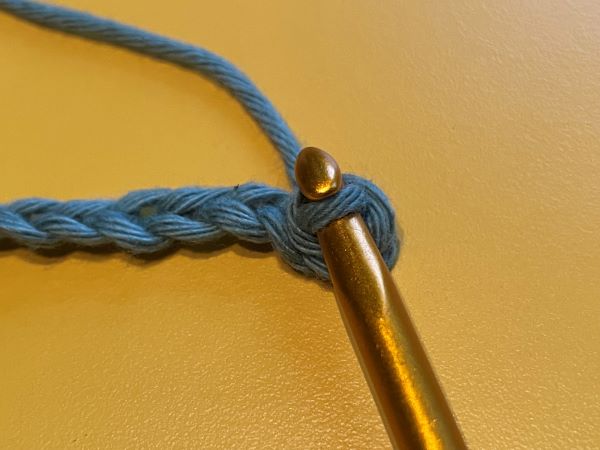
Now we’ll move on to what is known as a half double crochet in US crochet terminology. Place the working yarn over your crochet hook. This is referred to as ‘yarn over’ in crochet terminology. Keep the yarn over your crochet hook so that it looks like there are two loops on your hook, insert your hook into the chain stitch next to the chain you just slip stitched into.
Now pull a loop of working yarn through that chain stitch so that you have what appear to be three loops on your hook.
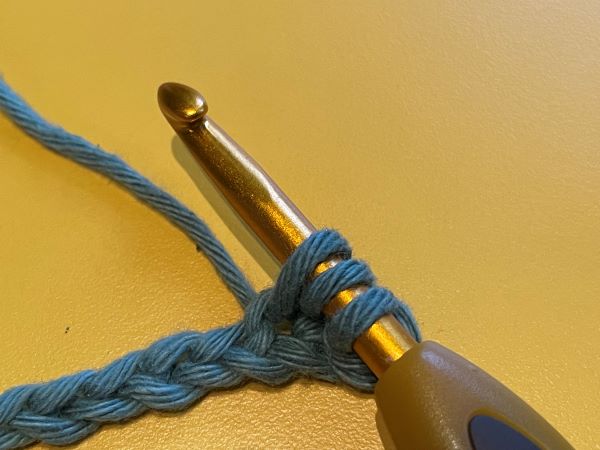
Now (without inserting your hook back into the chain stitch) pull up another loop of yarn. You should now have four loops on yarn on your hook.
Pull the loop of yarn you just added to your hook (the one at the top of the four loops on your crochet hook) through the other three loops. That’s your half double crochet stitch done!
You can see a short video of how to do this row of slip stitches and half double crochets below.
Now do a slip stitch into the next chain stitch in the row, followed by a half double crochet into the chain stitch after that. Continue this pattern until the end of the row. You should finish on a slip stitch into the loop of the slip knot at the start of your row of chains.

Chain one after that last slip stitch. This will allow you to easily turn your work around and start stitching into the slip stitch you just did in order to start a new row.
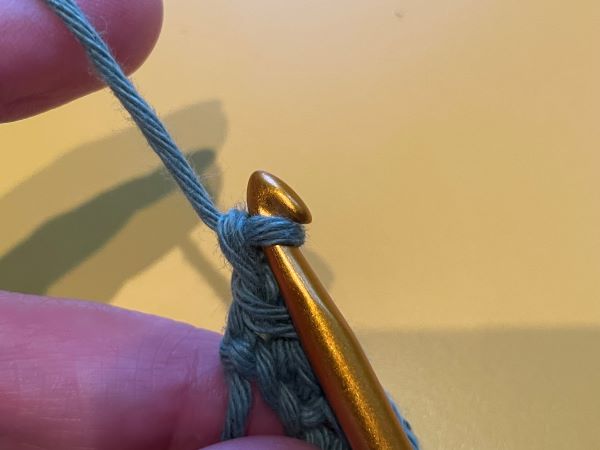
For this next row and all other rows from now on, you’ll be sliding your crochet hook under the ‘V’ shape formed at the top of the stitches from the previous row. Start and finish each row with a slip stitch. So alternate between slip stitch, then half double crochet until your last stitch (which will always be a slip stitch) before doing a chain stitch and turning your work.
The slip stitch you end with for your last stitch in the second row of slip stitches and half double crochets is a bit fiddly. You’re stitching into the slip stitch you did in the second chain from your hook at the start of the first row of slip stitches and half double crochets. That first slip stitch sort of hangs off to the side, as you can see below.

Continue to alternate between slip stitch and half double crochet until the end of each row before doing a chain stitch and turning your work for 52 rows for a ‘classic’ shape reusable coffee cup/ travel mug, 49 for a slimmer coffee cup or as many rows as you like until the piece is the length you want it to be.

When the piece is the length you want it to be, finish with your usual slip stitch and chain one before cutting your working yarn with a pair of scissors. Remember to leave a long tail for sewing. Pull the tail of yarn through the chain one you just did. This should be longer than the tail at the bottom of the slip knot at the beginning of your piece.


Thread the shorter tail end at the beginning of your piece through the eye of your tapestry or yarn needle and sew it into the first row of your piece to conceal it. Then tie a knot close to the fabric of the piece and snip off the excess yarn/ rest of the tail end.


Take the longer tail end of yarn at the end where you have just finished crocheting and thread that through your tapestry or yarn needle. Now fold your piece in half, making sure the ends match up against each other, and begin to sew both ends of the piece together.

Once you get to the end of one row of stitching the halves together, bring your needle around to the other side of the piece and do another row of stitches to make the piece extra secure.

At the end of your second row of stitching, tie a knot close to the fabric of your piece and snip off the excess yarn tail. Now turn the piece inside out to hide your knots.
Adding buttons (optional)
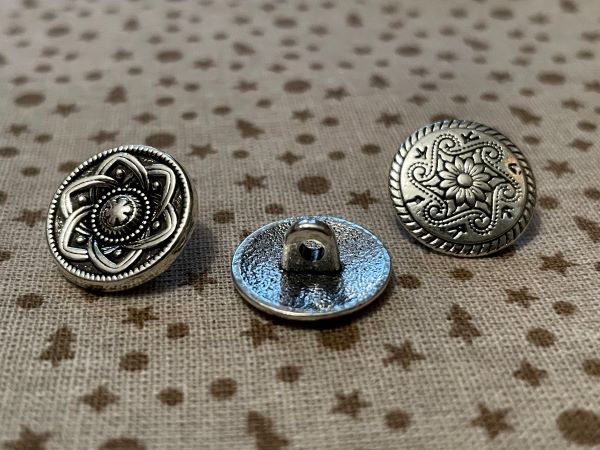
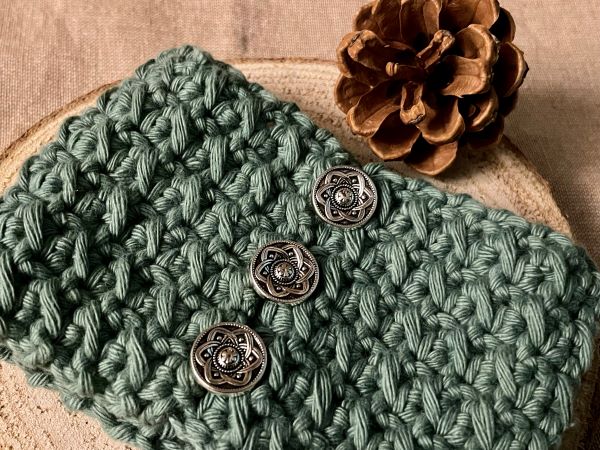
I added some small metal shank buttons, about 13mm in size, to the coffee cup cosies I made in order to give them a bit more of a festive feel. You’ll want to make sure that any buttons you use have a large enough hole to pass your yarn and tapestry or yarn needle through.

First thread a long piece of yarn onto your tapestry or yarn needle, then pass it through the hole (or one of the holes) of your button. Pass that yarn through one side of the seam you just sewed to hold your coffee cup cosy together. Then thread the other end of yarn onto your needle and pass that end of yarn through the other side of the seam of your coffee cup cosy until both ends of the yarn are inside/ in the hole of your coffee cup cosy.


I secured my buttons with a couple of knots to the yarn I used as a thread to stitch them on to the coffee cup cosy, before cutting the excess yarn off and using that to sew more buttons on.
I added three buttons along the seam of each coffee cup cosy I made. The middle button can be a bit tricky to secure, so I would suggest turning the coffee cup cosy partially inside out in order to make securing the middle button easier. See below.

Here are my finished coffee cup cosies up close.

I hope you have fun making one of your own! – Steph
