
Learn how to stitch your very own sashiko clover in time for St Patrick’s Day with this free pattern and tutorial created by Steph.
You can find out more about the history of sashiko in another post; Sashiko: Simple Japanese Stitching

Whether it was one of your New Year’s resolutions or not, it’s never to late to take up a new craft- and this one is rather simple. Here I’ll be showing you how to stitch my spring clover sashiko pattern, which you can download below.
Before we jump into how to stitch the pattern, I’ll start off with a quick summary of what sashiko is and where I drew my inspiration for the pattern.
So what is sashiko?
Sashiko is a form embroidery which originated in Japan. This kind of embroidery uses a running stitch. It can be used to embroider more traditional geometric designs but many different types of sashiko patterns are now available. There’s no need to split the thread as you would embroidery floss when working on a sashiko project, as sashiko is traditionally done using a thick thread. If you’re interested in learning more about the history of sashiko, you can find out more in a post I wrote some years ago: Sashiko: Simple Japanese Stitching.
The Inspiration for the Spring Clover Sashiko Pattern
I thought it would be nice to mark the seasons by creating a sashiko pattern for each season. A lot of traditional Japanese patterns take their inspiration from nature, such as the asanoha pattern (a geometric pattern of hemp leaves) and the seigaiha design (a design of waves). I started to think about the different symbols we associate with the seasons in Britain and Ireland. I wasn’t quite confident in my ability to design a sashiko pattern of bluebells or daffodils just yet but one of the first festivities that pops up in March, at the start of spring, is St Patrick’s Day.
A piece in the Whitworth’s collections, on display in our Everyday Art School at the time of writing, has some rather pretty shamrock and rose details. The Design for ‘The True Union‘ was produced by the artist Walter Crane (1845-1915) and depicts England and Ireland as equals. The two countries are personified as female figures clasping hands. Standing between the two is a putto, who wears a tunic which sports motifs of shamrock and roses, a design of heart with the initials ‘E & I’ joined together inside sits in the centre of his tunic. A banner emblazoned with the words ‘JUSTICE & EQUALITY’ winds around his legs. A dove in each top corner of the drawing carries a banner which says ‘HOME RULE’.
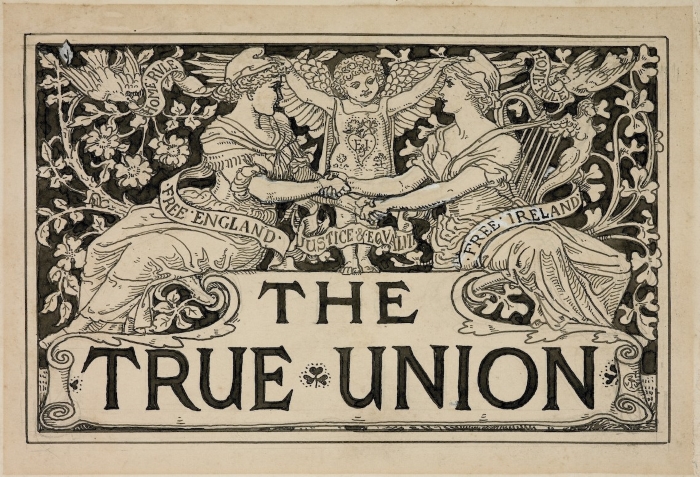
The piece was produced in 1885, and it was around this time that Walter Crane was becoming more political. In 1884, influenced by his friend William Morris, Crane became a socialist. During the 1880s he also produced works, like the Design for ‘The True Union’ pictured above, which supported home rule in Ireland. In addition to Design for ‘The True Union’, Crane created a design ‘for a Manchester cotton printer‘ which depicted ‘little figures of England, Scotland, Wales and Ireland, the latter with a flag inserted ‘Home Rule!”[1] The piece was intended for ‘a special jubilee production‘ but, according to a piece published in The Artist in 1897, ‘the manufacturer could not quite “see his way” to using it.‘[2]
The Royal Jubilee Exhibition was held in Manchester in Old Trafford in 1887 for Queen Victoria’s Golden Jubilee. Crane has other links to Manchester, too; he was made Director of Design at The Manchester School of Art in 1893- but he only stayed on in the position for a few years.
Queen Victoria’s diamond jubilee was celebrated in June 1897. The piece I have quoted from was published in a volume of The Artist which covered the period from January – June 1897. I’m honestly not sure which of the jubilee celebrations the design described in the piece I have quoted above was intended for, but I’ll keep on looking for more information and update this post if I find anything. The Whitworth’s collections contain decorative designs produced by Crane for the 1887 jubilee, as well as a seat reservation card designed for the 1897 Diamond Jubilee. According to an entry for Crane’s The Golden Age wallpaper on the V&A’s collection search and Greg Herringshaw, the Assistant Curator of Wallcoverings at Cooper Hewitt, Smithsonian Design Museum, The Golden Age was exhibited at the Royal Jubilee Exhibition in Manchester, 1887.[3] [4]
The shamrock and rose detailing on Design for The True Union reminded me of my grandfathers. My Irish grandfather, who came to England from County Mayo, had what we knew as shamrock in his garden. It took over a fair bit of his garden, too. My other grandfather, half-English and half-Scottish, grew roses.
There doesn’t seem to have been a great amount of consensus as to which species specifically is meant by the term ‘shamrock’. ‘Shamrock’ is thought to come from the word seamróg, which is translated as ‘clover’ or some variation such as ‘little clover’ or ‘young clover’. The two species of clover that are usually known as ‘shamrock’ are lesser clover (Trifolium dubium) and white clover (Trifolium repens). Wood sorrel (Oxalis acetosella) has also been suggested as one of the plants which could be called ‘shamrock’.
Stitching the Pattern
For this sashiko project, you will need:
- A sashiko needle.
- Sashiko thread. I used a grey thread of medium thickness on the green fabric and a black thread of medium thickness on the cream fabric.
- Cotton or linen fabric. The green fabric I used is Kofu tsumugi fabric, the cream fabric I have used in the pictures for the tutorial is Azumino momen. Both types of fabric are ideal for sashiko but you don’t necessarily have to use these. Denim is also a good option for sashiko projects.
- Scissors.
- A pen.
- Carbon paper for embroidery. This is also called embroidery tracing or embroidery tranfer paper. I use the chacopy paper made by the Clover company, who also make various bits and bobs for sashiko, but any kind of paper used to transfer embroidery patterns will do.
- My free spring clover sashiko pattern:
I’m going to use the sashiko clover I stitched on the green fabric as part of a patchwork project for a large square coaster/ mug rug. I intend to create and publish other sashiko patterns, one for each season, on this site throughout 2025. So, if you feel like marking each season with a bit of sashiko, keep coming back to A Place Between the Trees and stitch this project along with me.
It helps to have a larger piece of fabric, such as a fat quarter, which you can cut into smaller pieces. This will give you enough fabric to practice with and complete this part of the patchwork project I have planned.
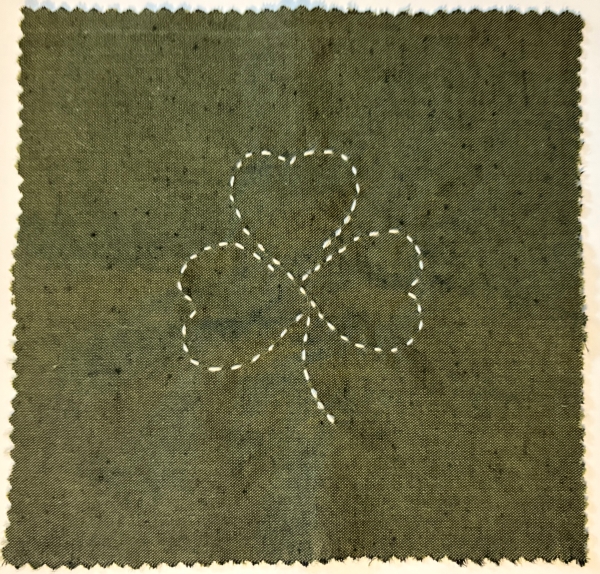
For the sashiko clover patch I intend to use for my patchwork mug rug project, I used a 6-inch x 6-inch square of green Kofu tsumugi fabric.
Step 1:
Prepare your fabric (wash and iron it and cut it to size) and then print off the clover sashiko pattern.
Step 2:


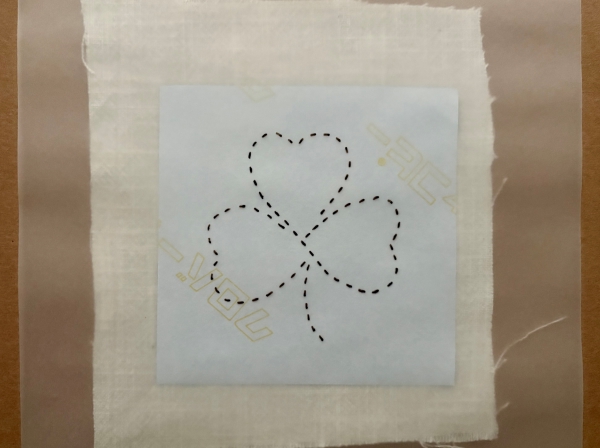
After you have printed the clover sashiko pattern, place the pattern face up on top of your embroidery carbon paper/ tracing paper. Place the pattern and tracing paper on top of your fabric in your desired location. Make sure you place the pattern on the back of the embroidery tracing paper (not the side with the chalky coating, which should be face down against your fabric).
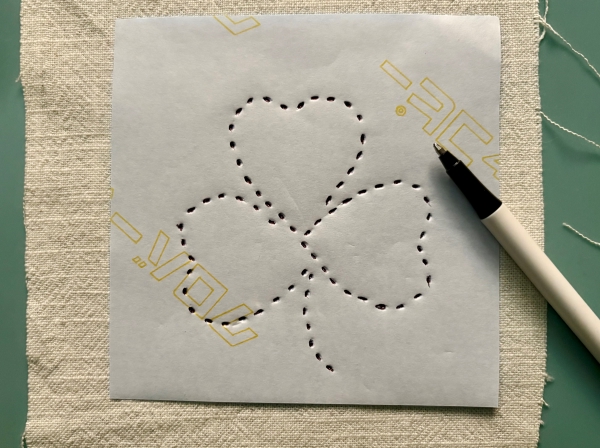
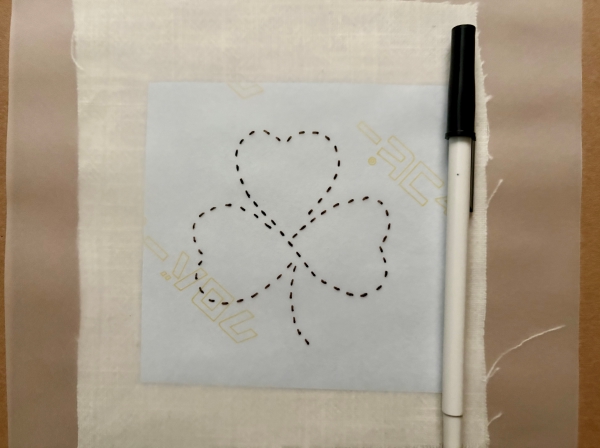
Using a pen, trace the outline of the sashiko pattern. You may need to apply a fair bit of pressure to make sure that the pattern is transferred from your carbon paper/ tracing paper to your fabric.
You may even need to go over the pattern again on the back of your embroidery tracing paper.
Peel the tracing paper away from your fabric slowly, so you can see if the pattern has transferred to the fabric.
Step 3:
Cut a length of thread and thread your sashiko needle.
Do not knot the end of your thread.
Tip: It can be a bit hard to find the ends of a skein of sashiko thread, unlike embroidery floss. It helps to take the paper tube it has been threaded through off and open the skein of thread up by place both your hands through the centre of the skein. The ends of my thread were knotted together.
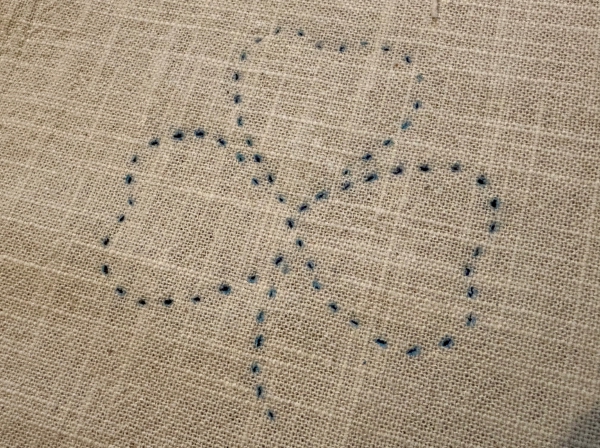
Step 4:
Starting off and finishing off are probably the trickiest steps of sashiko but once you get the hang of it, you’ll be alright.
Insert your needle through the back of your fabric, a few stitches into the pattern. For these first stitches, you will be stitching in the opposite direction to that indicated by the arrows on the little diagram included on the pattern.
The starting point is on your right, on the right-hand side of the top leaflet of the clover.
Pick up a few stitches on your needle, with the tip of the needle going back down into the back of your fabric. Push the needle through the fabric. Be careful not to pull the fabric or the thread too tight.
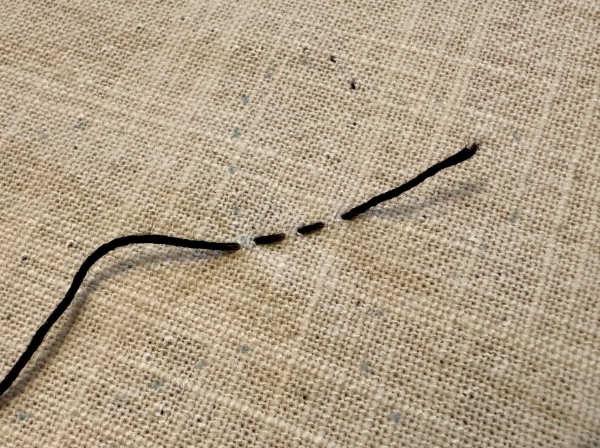
Do not pull all the thread all the way through the fabric. You need to leave a short tail at the back.
Step 5:
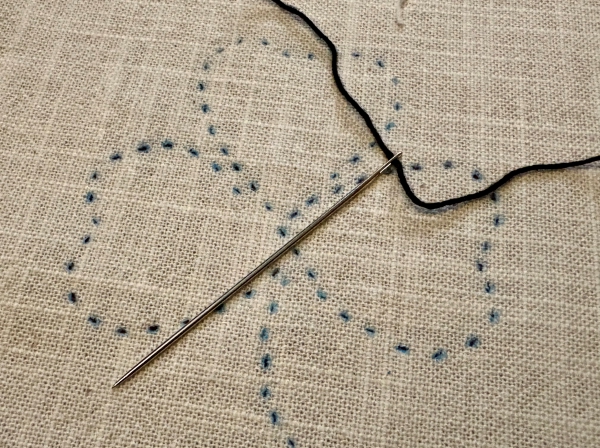
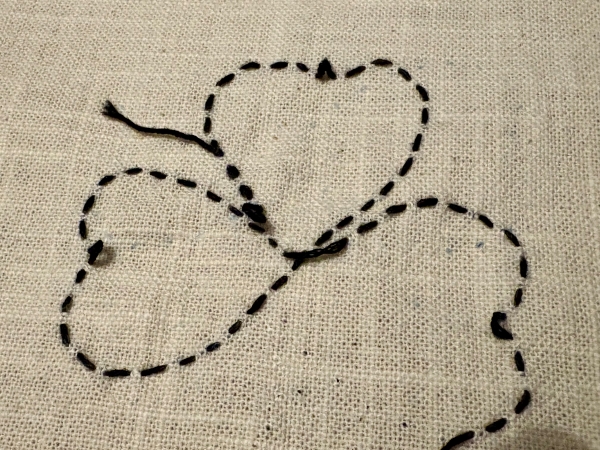
From now on you’ll be following the directions on the diagram featured on the pattern. This first part is a bit tricky but, once it’s over, the pattern becomes a lot easier to stitch.
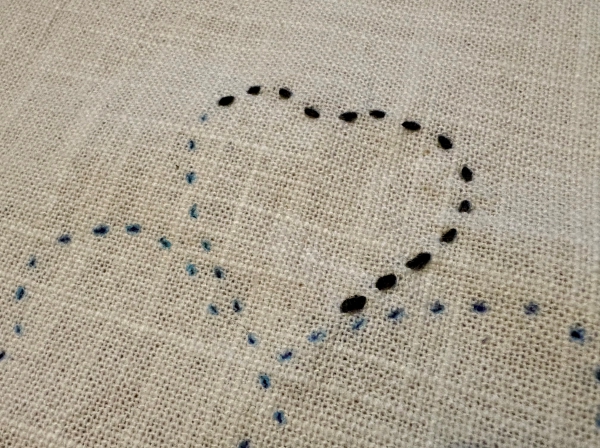
Insert your needle up through the back of your fabric, through the same hole you exited through when you stitched your first few stitches.
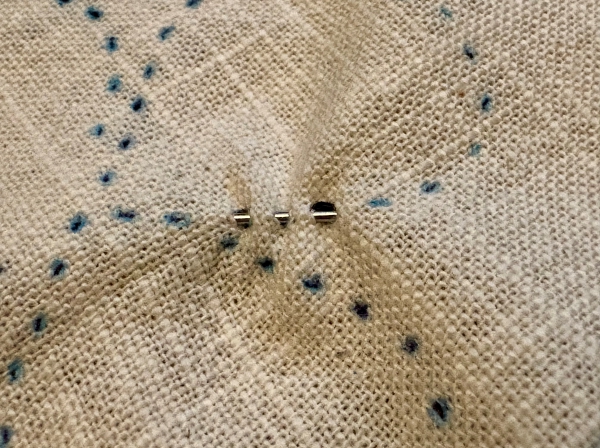
Go over those first few stitches by inserting your needle through the same holes you made earlier. Again, make sure that not all your thread goes through the fabric when you push the needle through it. You need to leave a small loop of thread on the back when you go back through that first hole, like so:
If you don’t do this, prepare to have your stitches unravel.
Step 6:
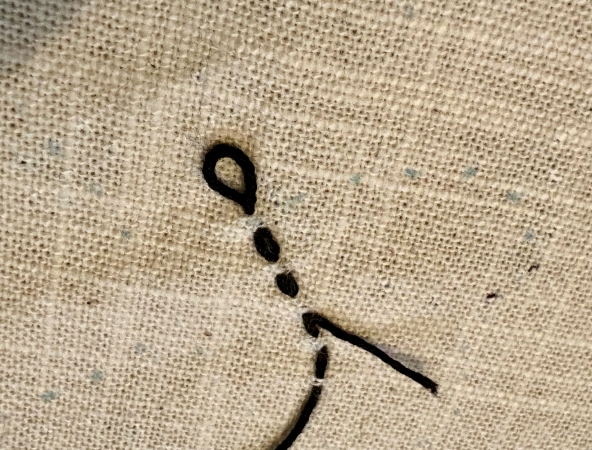
Continue stitching the pattern in the direction indicated by the arrows on the diagram, like this:

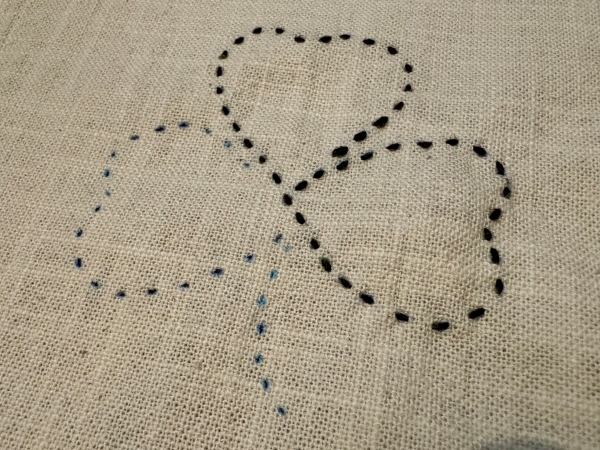
You should start stitching on your right, on the right-hand side of the top leaflet of the clover. You will go up and around to the left, completing the upper leaflet of the clover, then down diagonally to the bottom of the bottom right-hand leaflet before curving up and to the left to finish that leaflet.
You’ll need to leave a longer bit of thread loose on the back as you cross over to start stitching the final leaflet. When you have move across to the left-hand leaflet and around and down to the stem, you will finish off the clover by going over your last three stitches again.
Whenever you need to turn direction in an area which requires a longer space between stitches, such as the dip at the top of each leaflet, leave a small loop of thread of the back of your fabric at the turning point. This loose tension means that the fabric will not bunch up and pull. When crossing over from one bottom leaflet to the other, you will need to leave a larger loop of thread, like so:
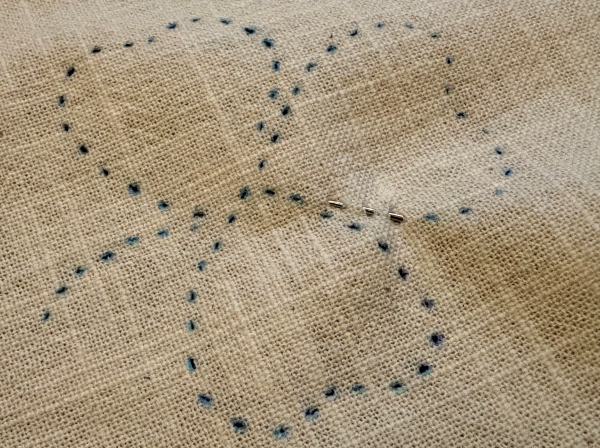
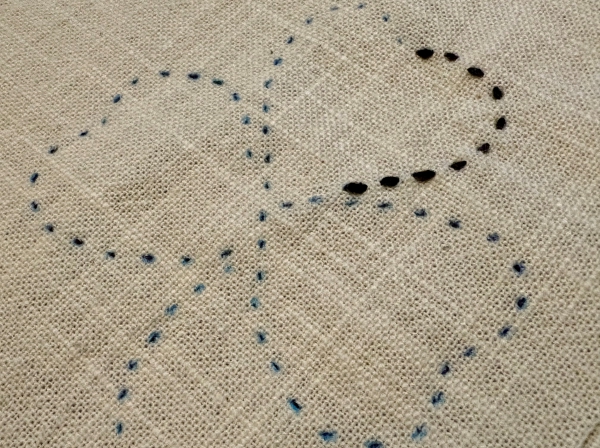
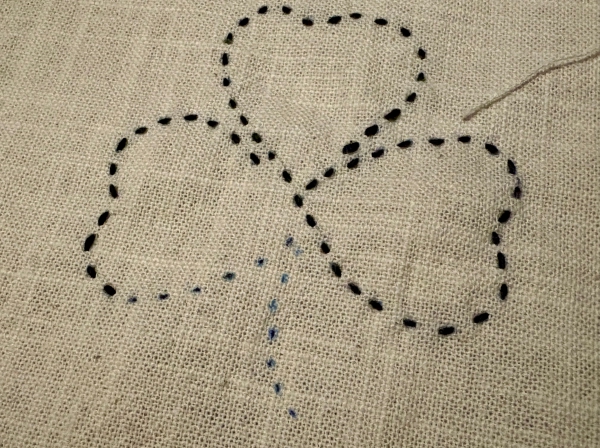
Step 7:
Finishing off the clover:
To finish off the clover, you will have to double back and go over the last few stitches you have done on the stem, much like when you started off.
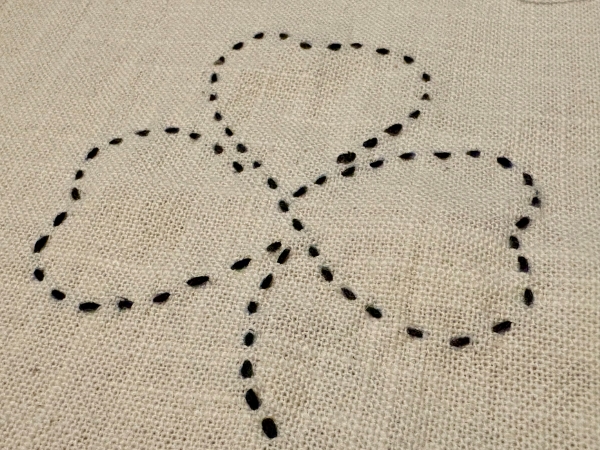
Remember to leave a loop of thread on the back before you go back up into the exit hole of your last stitch.
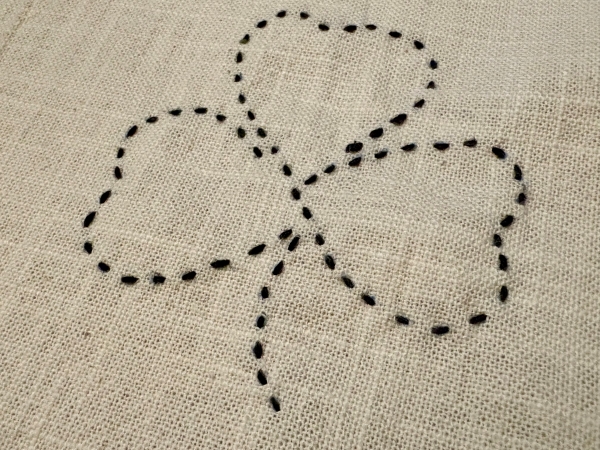
I hope you have enjoyed stitching your sashiko clover!
– Steph
References
[1] Mabel Cox, ‘Arts and Crafts Workers I. Walter Crane’, The Artist: An Illustrated Monthly Record of Arts, Crafts and Industries, Vol. XIX January to June 1897, (London, 18970, pp.30-31.
[2] Cox, ‘Arts and Crafts Workers I. Walter Crane’, The, (London, 1897), pp.30-31.
[3] V&A, ‘The Golden Age’: https://collections.vam.ac.uk/item/O224430/the-golden-age-wallpaper-crane-walter/
[4] Greg Herringshaw, ‘The Golden Age, or Two Putti and a Goat’, 4 February 2020: https://www.cooperhewitt.org/2020/02/04/the-golden-age-or-two-putti-and-a-goat/
Bibliography
Manchester Metropolitan University, Manchester School of Art Timeline: https://www.art.mmu.ac.uk/about/timeline/
Mabel Cox, ‘Arts and Crafts Workers I. Walter Crane’, The Artist: An Illustrated Monthly Record of Arts, Crafts and Industries, Vol. XIX January to June 1897, (London, 1897), pp.24-32.
Alan Crawford. “Crane, Walter (1845–1915), illustrator, designer, and painter.” Oxford Dictionary of National Biography. January 10, 2013. Oxford University Press. Date of access 20 Jan. 2025, <https://www.oxforddnb.com/view/10.1093/ref:odnb/9780198614128.001.0001/odnb-9780198614128-e-32616>
Sarah Fiorello, ‘Which Plant is the Real Shamrock?’, Cornell Botanic Gardens, March 16 2023: https://cornellbotanicgardens.org/which-plant-is-the-real-shamrock/
Mason Herberling, ‘What is a Shamrock?’, Carnegie Museum of Natural History: https://carnegiemnh.org/what-is-a-shamrock/
Greg Herringshaw, ‘The Golden Age, or Two Putti and a Goat’, 4 February 2020: https://www.cooperhewitt.org/2020/02/04/the-golden-age-or-two-putti-and-a-goat/
Bess Lovejoy, ‘No One Really Knows What a Shamrock Is’, Smithsonian Magazine, March 16 2015: https://www.smithsonianmag.com/arts-culture/no-one-really-knows-what-shamrock-180954578/
Paul Ward, Britishness Since 1870 (London, 2004).
V&A, ‘The Golden Age’: https://collections.vam.ac.uk/item/O224430/the-golden-age-wallpaper-crane-walter/

One thought on “Steph’s Spring Clover Sashiko Pattern”