
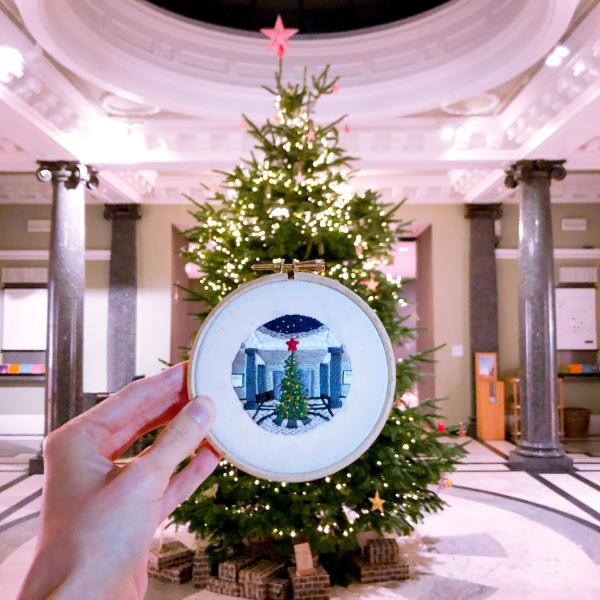
Embroidery and image by Victoria Hartley @Stitchedoritdidnthappen
This December we will be posting a virtual advent calendar on social media. Expect gift ideas, pick me ups and festive posts. The Whitworth may not be open yet but our festive spirit is in full bloom! Here you’ll find the full tutorials for some of our craft and gift ideas.
- Air Dry Clay Decorations
- Dried Fruit Decorations
- Origami Emotional Support Dinosaur
- Christmas Rose Lantern
- Orange Flavoured Hot Chocolate
- Origami Bird
- Playing Card Bookmark
- Origami Fox
- Cinnamon Sugar
- Let it Snow! DIY Snow Globes
- DIY Lip Scrub
- Mulled Wine
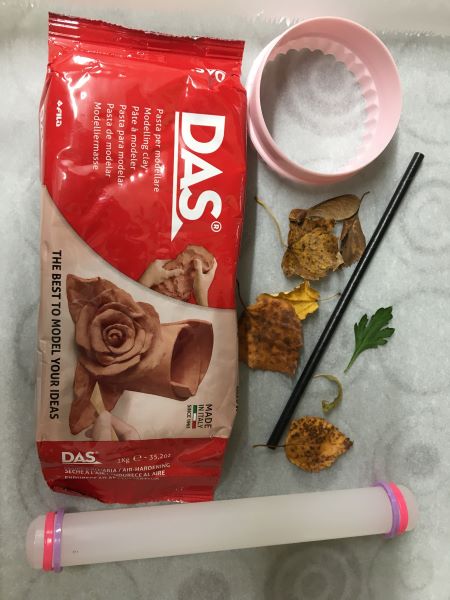
Air Dry Clay Decorations
Steph tried her hand at making air dry clay decorations this year and evetually got there by a fair bit of trial and error to save you the hassel of learning the hard way! Find out how to make two kinds of decorations below.
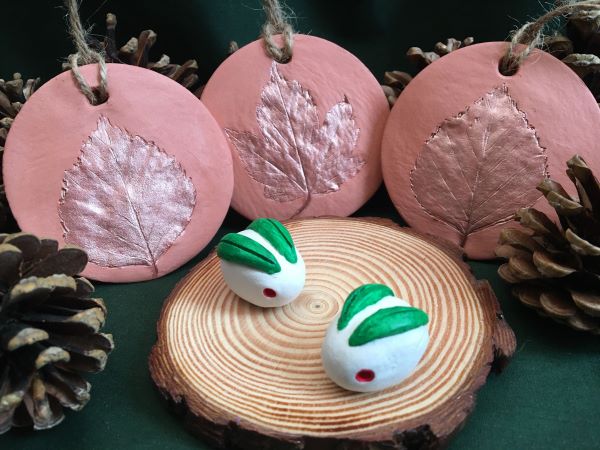
For the yuki usagi (snow bunny/ hare) you will need:
- White air dry modelling clay
- Thin paintbrush or pencil
- Cheap clay modelling tools or a spoon to cut out ‘ear’ shapes
- Greaseproof paper or foil
- A bowl of water
- Red and green acrylic paint
For the hanging decorations you will need:
- Air dry modelling clay in a colour of your choice
- Greaseproof paper or foil
- Something to roll out the clay such as; a fondant rolling pin, a glass bottle or an old flask. You need something the clay will not stick to a lot.
- Leaves and/ or rubber stamps
- Cookie cutters (optional but these help you get a nice round shape)
- A paper straw (to create a hole to loop a ribbon or twine through)
- Ribbon or twine
- A bowl of water
- Acrylic paint in a colour of your choice (optional)
Air dry clay is cheap and easy to use. It’s versatile stuff, which makes it perfect for making little decorations. You don’t need much in the way of supplies to get started. You could make snow-themed sculptures like the little yuki usagi or roll out your clay to make hanging decorations.
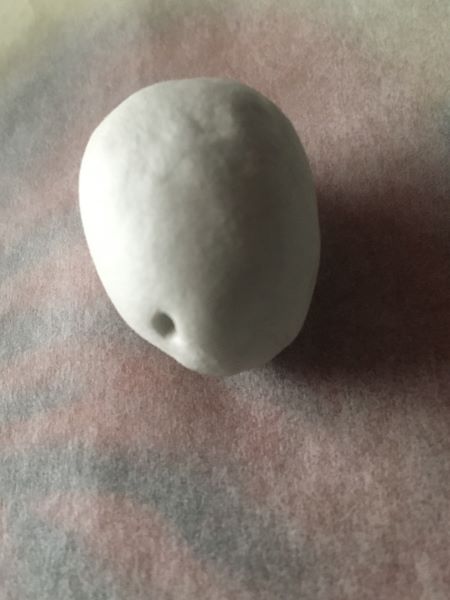
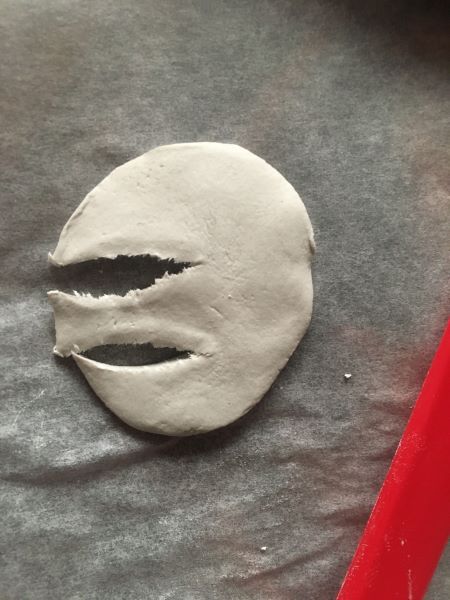

In order to make a yuki usagi, you simply need to mould a small piece of white air dry clay into an oval shape and then use the end of a thin paintbrush or a pencil to add some ‘eyes’ to the face area. To make the ears, flatten out a small piece of clay using your hand and then use a spoon or any modelling tools you may have to cut out ear shapes. Glue these on to the main body by using a tiny bit of water to help the underside of the ears stick to the body better. Gently pat the ears down a bit until all of the ear shape is touching the body. That’s it! The hardest part is over.
You can add little details using a spoon or modelling tool to make the ears look more like leaves or just wait until it’s dry to paint those details on. Leave it to dry completely on a piece of greaseproof paper or foil before painting the eyes and ears.
The supplies you will need 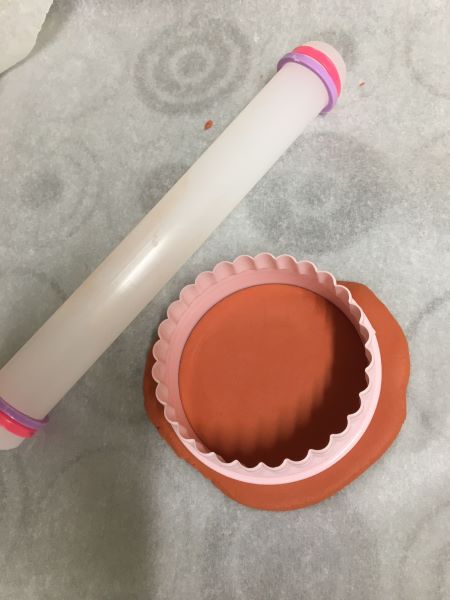
You can try to roll and flatten the clay using your hands but using something else will save time. If you don’t have a non-stick rolling pin, try an old flask or a glass bottle. 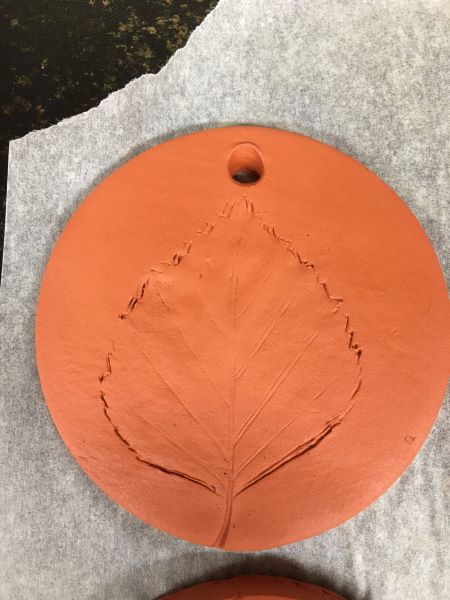
Before you add details to your decorations, poke a hole in the top of your piece using a paper straw. 
Using leaves to make an impression on your clay is an easy way to make lovely patterns on your decorations. 
You can also use small rubber stamps to add details to your decorations.
For hanging decorations, using the underside of leaves to make impressions on your decorations is an easy way to create a lovely pattern. Crisp leaves seem to make better impressions than softer leaves, so the tougher leaves of the evergreen plants we often use as decorations at this time of year should work well. You can also use rubber stamps to add little details to your decorations.
You can use your hands to roll and flatten the clay out but using something else to roll it can save a lot of time. A small rolling pin for icing, a tall glass jar, a glass bottle or an old flask should do the trick without making too much of a mess. The clay should wash off them fairly easily, leaving you free to use them again but make sure you don’t use your best flask, just in case! Roll the clay out on greaseproof paper or foil.
Paper straws come in handy for making a hole to loop some twine through on hanging decorations. You can squeeze out any clay that gets caught inside the straw fairly easily and reuse the straw and clay. Use a tiny bit of water to smooth out the surface of the clay and to help make any impressions you are going to add using leaves or stamps clearer. Keep a bowl of water handy and dip the tip of your finger in it whenever you want to smooth out rough edges, add new details or keep the clay from drying out as you work. You can brighten up your decorations with some acrylic paint once they’re dry or just leave them as they are for a more rustic look.
Tips: Make sure the top of your pieces are dry before turning them over to help the underside dry. It can take a few days for them to dry completely, so be patient.
Don’t leave your decorations or sculptures to dry in a room where the temperature fluctuates a lot; this could make cracks appear in your work.
Keep any clay you have left over inside its packet in an airtight container to use another day.
Dried Fruit Decorations
Dried fruit is a festive classic. Ash walks you through the delicious process of making your own dried fruit decorations in this tutorial– just don’t eat most of your main ingredients!
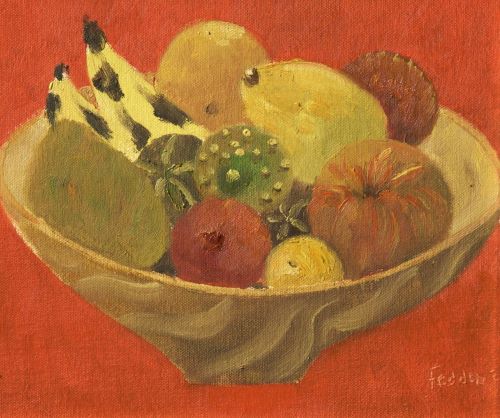
We have this painting in our collection called Fruit at Christmas by Mary Fedden (1912-2012). Now if you’re anything like me when it comes to Christmas food fruit probably isn’t as high up on your agenda as it should be.
So, in a piteous attempt to inspire some of us to add an extra 1 of our 5 day into our shopping trollies, I thought I’d quickly show you how easy it is to make dried citrus fruit decorations. Now, all you’re going to need is an oven, chopping board, knife, baking tray and obviously some citrus fruit & some ribbon / string.

Right, so first things first; you want to cut your fruit real thin- probably thinner than I have in the photos come to think of it! I’ve used an orange and a grapefruit but feel free to be a maverick and use any citrus fruit.
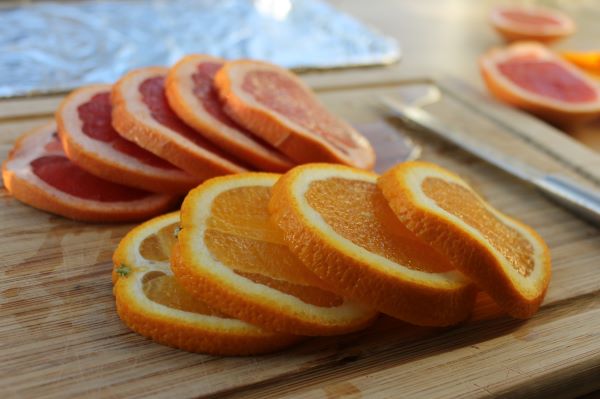
Then simply line your cut fruit on a baking tray & pop them in the oven for 2 hours at 75°C, which is the lowest setting on my oven. If yours can go lower maybe go lower? I’m no expert so feel free to pitch in and call me out here!

The next step is my favourite step as it basically involves eating the left over bits of fruit whilst waiting! Once your 2 hours have passed merely flip the slices over so the other sides get dry in all. After another 2 hours you are probably ready to take them out to cool.

Once cool, just tie a little ribbon or string through them and boom! You are ready to hang them wherever whenever. Simples. I’ve been Ash, this has been my instalment of #WhitworthAdvent. Enjoy your dried fruit, stay safe and fingers crossed we’ll be welcoming you back to the gallery soon!

Origami Emotional Support Dinosaur
Calling all dinosaur fans! Why not have a go at making your very own origami emotional support dinosaur? Ruby shows you how in the video below.
Christmas Rose Lantern
The lush colours and vibrant pattern of this handmade Christmas rose lantern, made by Rececca especially for the Whitworth Advent, are both inspired by and reflect the exquisite Jamdani silk and cotton handwoven Sari from the Whitworth Collection and the colourfully seasonal Hellebore flower or Christmas rose.
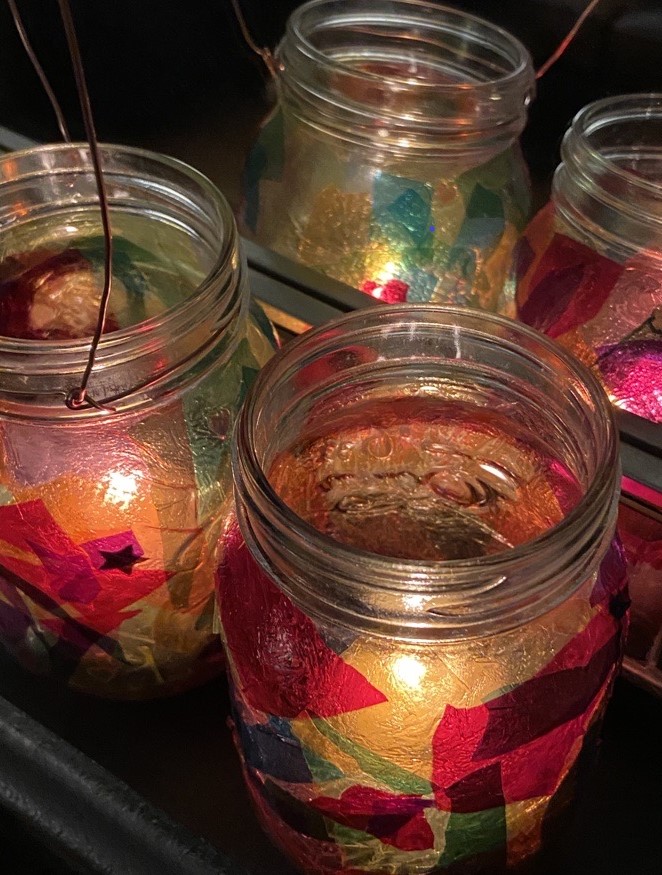

To make a handmade Christmas rose lantern perfect for cosy winter nights in, you will need:
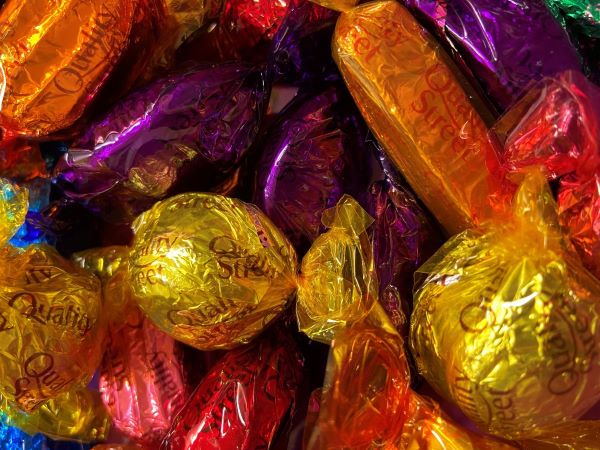
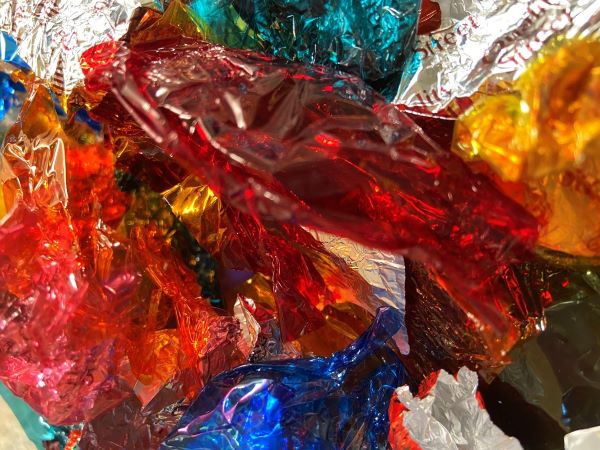
- Quality Street Cellophane Wrappers (it’s OK if you don’t want to use these, just use multi-coloured cellophane sheets instead)
- Any shiny craft embellishments you might wish to add, i.e. heart/ butterfly sequins
- A glass jar (Mason jars work well)
- PVA glue & glue brush
- Modelling clay or plasticine
- Wire
- A tea-light
- Safety candle lighter
One of the best things about this activity is you get to eat the Quality Street chocolates! The cellophane wrappers are perfect but cellophane sheets work just as well.


Step 1: Brush glue onto the jar. If the glue is too thick, it can be mixed with a little water. Rip or cut the cellophane into the required shape and stick onto the jar. Brush a little more glue over the top and smooth over with your fingers.
Top Tips: Remember to layer the shapes for depth and colour and to add your embellishments! Use a lighter colour like yellow for the background.
Step 2: Once the jar is fully covered and you are happy with your design, let everything dry. The glue will dry clear.
Step 3: Optional. Make a wire handle. There are several ways to do this. The easiest way is to wrap some wire round the rim of the jar. Take a second longer piece and loop it through the wire neck twice, at opposite ends, and pinch-twist it closed. You should now have your handle.
Step 4: Use the modelling clay to make a base on which to firmly press the candle.
Step 5: Light the candle, sit back and take a moment to enjoy the ambient glow!
As they say in Bengali, ‘shubho bôṛodin’ (শুভ বড়দিন)!
~Merry Christmas!
Orange Flavoured Hot Chocolate
Many of us relish the feeling of curling up under a warm blanket with our favourite beverage during the colder months. Follow Jason’s recipe and treat yourself to a delicious cup of hot chocolate…
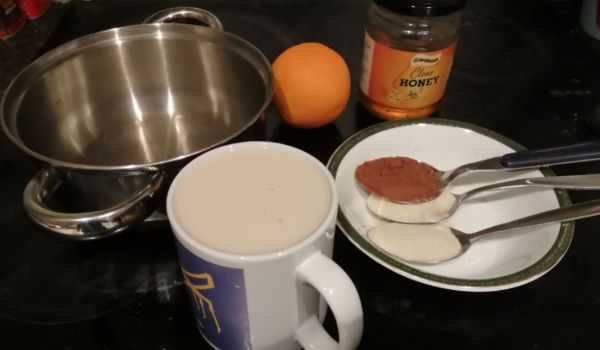

What better way to warm yourself up than with an orange flavoured hot chocolate?
Ingredients:
- One mug full of milk (I used almond milk)
- One orange
- Two tbsp sugar or runny honey (you can add more at the end to adjust to taste)
- One tbsp cocoa powder (if your cocoa contains sugar, you won’t need to add sugar or honey)
Method:
- Fill one mug, just below the brim, with milk and then pour into a saucepan (your milk will reduce a little as it simmers, so don’t worry about over pouring at the start).
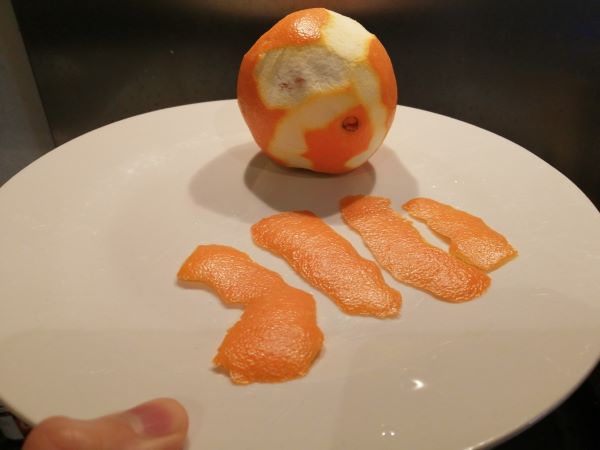
- Using the palm of your hand, roll an orange on a surface to help release the oils, then using a small knife or potato peeler, remove 5 long strips of orange peel, squeeze the peel with your fingers, and add to your milk.
- Add the sugar/honey and cocoa powder to your mixture.
- Put your saucepan onto a medium heat and gently whisk your mixture until combined.
- Allow your mixture to simmer for 10 minutes, for your flavours to infuse, stirring every couple of minutes.
- After 10 minutes, strain your hot chocolate , using a sieve, into your mug or pick out the orange peel with a spoon.
- Optional- you can embellish your hot chocolate with ground cinnamon, chocolate flakes or marshmallows!
- Enjoy!
Origami Bird
Whether they’re plucky robins or beautiful turtle doves, we’re sure you’ll have fun making a whole flock of feathered friends to keep you company during the festive season! Ruby guides you through the process of making origami birds in the video below.
Playing Card Bookmark
Do you need to make a lot of stocking fillers in a short amount of time? Playing card bookmarks are cheap and easy to make, just follow Steph’s instructions below.

Think twice before throwing away old playing cards! With just a few supplies, you can transform any old, unwanted playing cards (or tarot cards!) into bookmarks or gift tags.
You will need:
- Playing cards (or you could use old tarot cards)
- A hole punch
- Embroidery thread, ribbon, or twine.
- Beads (optional). If you are using beads, make sure they have a large enough hole to thread your thread, ribbon or twine through.
- A pen or pencil
- Scissors
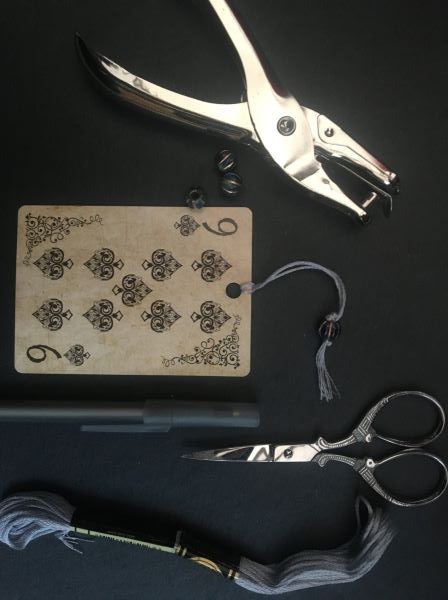
The supplies you will need. Beads are optional. 
Mark out where you want to make a hole 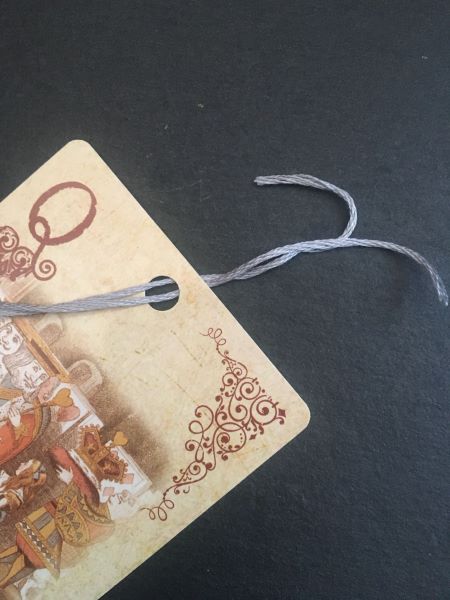
Make a lark’s head knot at the top of your card to secure your stringing material 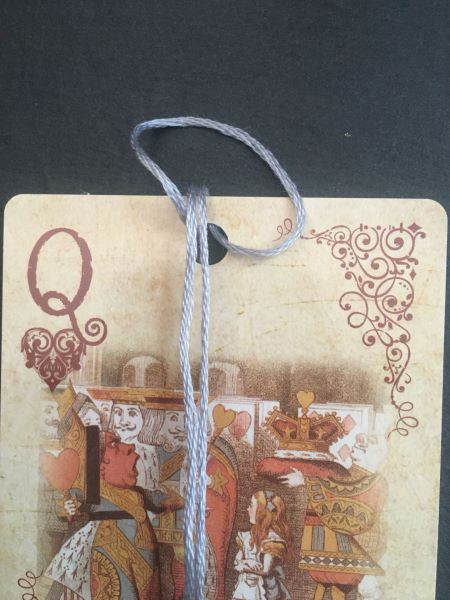

Use knots to secure your beads in place 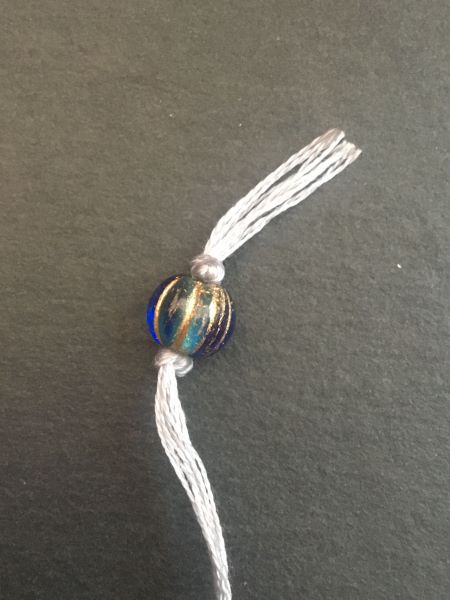
Using embroidery thread can leave you with a nice little tassel at the end 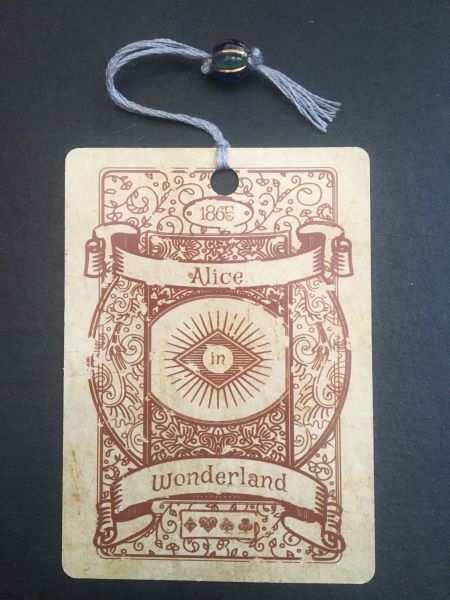
Themed playing cards like these Alice in Wonderland cards are also great for creating themed gift tags and shadow boxes- perfect for book enthusiasts!
Step 1: Select your card and use a pen or pencil to mark out the spot you want to thread your ribbon/ thread/ twine through.
Step 2: Using your hole punch, punch a hole through the card where you have made your marking.
Step 3: Select your stringing material and decide how long you want it to be – you will be folding it in half, so cut twice the length you want it to be once it is place onto your bookmark.
Step 4: Fold your ribbon, thread or twine in half and, holding both ends together, pass the middle of your stringing material (where it is folded) through the hole, so that you have a loop dangling through one side of the card and the ends of your stringing material are on the other.
Step 5: Take the loop of your stringing material and, still holding the ends together, bring the loop over the top of the card and thread the ends of your stringing material through it to form a simple lark’s head knot at the top of the card.
Step 6 (optional): Decide where on your stringing material you want your beads to go. Make a knot just before that point, to hold your beads in place. You may need to make a few knots in that spot if your beads have a large hole and your are using embroidery thread.
Step 7 (optional): Thread your beads onto your stringing material and tie another knot on the other side of the beads to hold them in place. If you have used embroidery thread, separating the strands of thread at the end will leave you with a nice little tassel look.
Ideas: You could also transform any unwanted playing cards or tarot cards into card embellishments, gift tags or use them to create a themed shadow box. You can buy hole punches for card making, usually for a very reasonable price, which will punch holes in different shapes. Why not try using these to add star shaped cut outs and other details to your cards?
Origami Fox
A group of foxes is called a skulk but there will be no skulking or sulking once you have made your very own origami fox! Use them as top-notch desk or mantelpiece decor or pop one in a card as a nice little pick-me-up for someone else! Ruby guides you through the process of making your very own fantastic foxy friend in the video below.
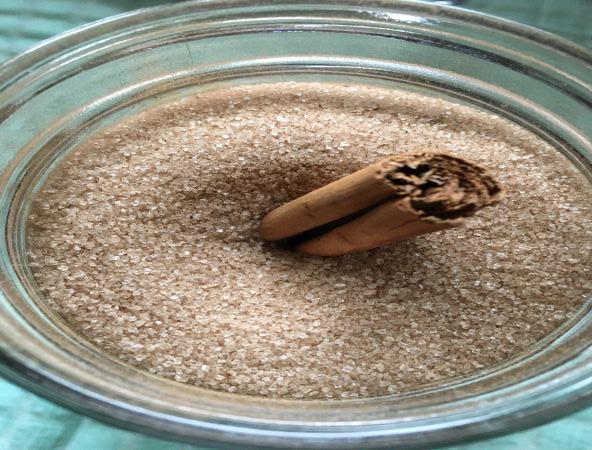
Cinnamon Sugar
Cinnamon sugar and other infused sugars are easy to make. They are a good, cheap gift for anyone in your household who is into baking or they can be nice little treat for yourself. Why not sprinkle some cinnamon sugar on porridge, pancakes or a hot apple pie to add a festive touch to these dishes? -Steph


Ingredients:
- Ground Cinnamon
- Regular granulated sugar
- A cinnamon stick (optional)
You will also need:
- A jar
- A spoon
- A bowl
This is one of the easiest things you can make. The trick is to cater the amount of ground cinnamon you use to your taste. I mixed about 1 1/2 tbsp. of ground cinnamon with just under half of a 1kg bag of granulated sugar to fill this jar, which is about 490ml. Start off with a small amount of ground cinnamon and gradually add more if you think you need to. Be careful not to add too much- especially if you’re going to add a cinnamon stick to the jar.
Simply pour your ground cinnamon into mixing a bowl with the sugar and stir it until the cinnamon has been thoroughly mixed in. Make sure there are no lumps of cinnamon powder in the mixture. That’s it! You’re done! Pour your sugar into the jar and, if you’re feeling fancy, you can add a cinnamon stick to the jar too.
Don’t worry about the shape of the containers you’re using. Always check your cupboards before rushing out to buy new jars. Different shaped containers can make gifts look more unique! You can dress up jars with a bit of ribbon or twine if you’re giving the cinnamon sugar as a gift to someone in your household.
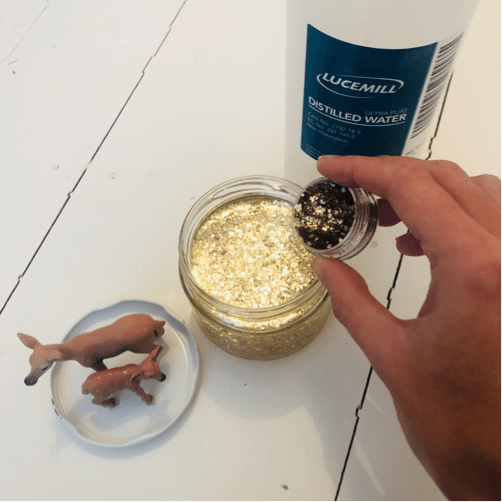
Let it Snow! DIY Snow Globes
Find out how to make some Christmas magic in a jar with Lucy’s tutorial below!

This year more than any I think we could all do with some magic and festive cheer to lift our spirits. I’m dreaming of a White Christmas (as I am every year) but as is usually the case the snow fails to arrive on cue. So, with that in mind, I thought why not bring the snow to us and create our own little Winter Wonderland with one joyous craft project…DIY SNOW GLOBES!!
I think they’re the perfect Christmas craft – fun to make at home and even more fun to give as presents. And it’s a great way to recycle your jam jars!
You will need:
- Glass jars
- Glycerine
- Glue (clear drying and waterproof)
- Glitter (I used my cosmetic glitter)
- Plastic toys
- Distilled water
- Spray paint & primer
- Oven bake modelling clay/ polymer clay
Instructions:
First remove the labels from your chosen jars and wash them thoroughly – most slipped off easily after soaking in warm water but, if not, a tip for removing that stubborn label residue is to use White Spirit on a cloth and rub. It worked like a charm!
As my jar lids weren’t in seasonal colours, I spray painted them white so they looked a little more festive. Make sure you use a water resistant paint if spraying the inside of the lid too. Using a primer spray paint gives your colour a good base to adhere to. Let it dry for the recommended time between coats and also before you start assembling your snow globe.
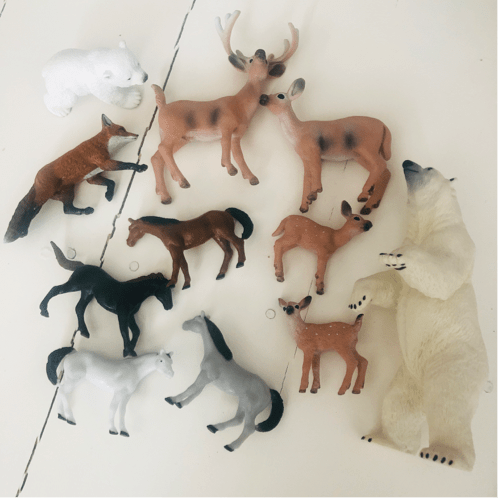
Select your figurine/toy. It needs to be plastic or ceramic – not metal, as this will be prone to rust. If your toy isn’t very tall you might want to use modelling clay as a base for your toy to stand on to give it some height. This will ensure it’s not obstructed from view by the neck of the jar.
Make sure you buy oven-drying clay (otherwise known as polymer clay) rather than air-drying, as it’s waterproof! It also takes a mere 30 minutes to set in the oven – bonus. I found some with a white glitter effect to it, which I thought would resemble snow quite nicely.
Work your clay into a ball shape and squish it into the lid of the jar. Make sure you leave enough space around the outside so you can screw the lid back on!
Press your toy into the clay and screw the jar on to check you’re happy with the position. Once you are, remove the toy and place your clay into the oven to cure.
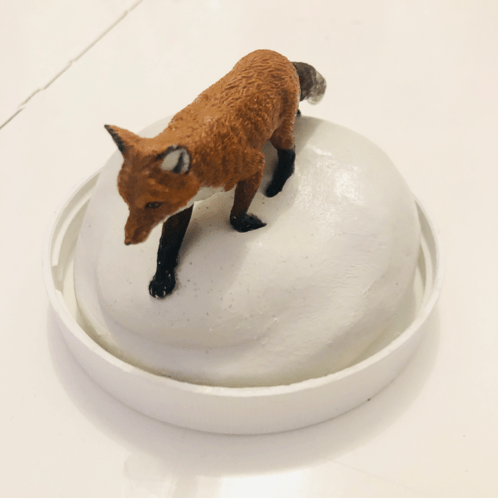

Once it has hardened and cooled you can now glue your plastic toy to the clay (or directly to the lid). Silicone glue is best as it dries clear and is also waterproof.


Fill the jar almost to the top with distilled water. You can use tap water if you wish but distilled is clearer and tap water has a tendency to go yellow over time.
Next (my favourite part!) add a pinch of glitter (or a lot!) and just a dash of glycerine – this magic ingredient will slow down the glitter’s descent. Be careful not to add too much otherwise the water will turn gloopy and glitter will stick to the jar. Finally, line the rim of the jar with glue and carefully screw on the lid making sure it’s tight. The glue should give the jar a nice, snug watertight seal.
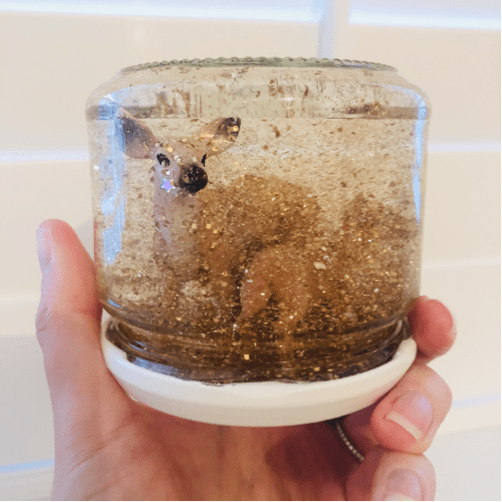
Now turn it upside down and watch the glitter whirl around in your own whimsical winter wonderland!
For my handmade snow globes I drew inspiration from the works of British artist Charles Frederick Tunnicliffe. His depictions of British wildlife have a real charm about them and the frost-filled landscapes tie in really well with this craft project. AND it just so happens I had several animal toys lying around without purpose (I have a five year old niece, by the way!)


Let it Glow!
Whilst I was in full snow globe swing I couldn’t resist utilising my polar bear figurines for a more Arctic Wonderland vibe. I can’t imagine anything more wintry or magical than a polar bear gazing up at the aurora borealis, surrounded by stars and snowflakes. To get that Northern Lights effect I painted the inside of the lids with some glow in the dark acrylic gel – the thicker the application the stronger the glow…just let them charge up near a light source then turn off the lights to see your snow globe glow!

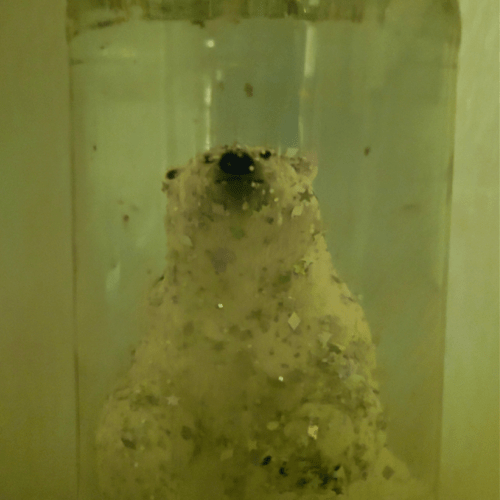

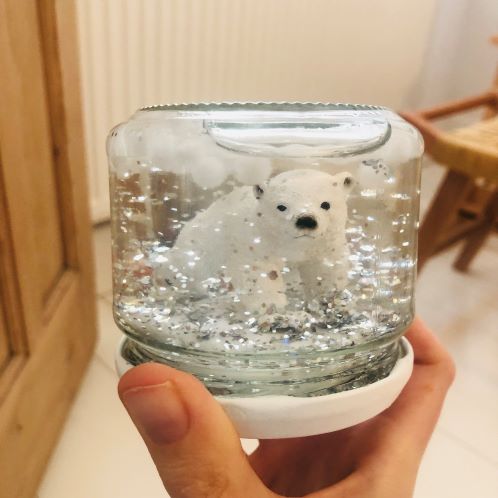
I wish you a magical, creative Christmas!
DIY Lip Scrub
Jack Frost may still be nipping at your nose but with Tahmina’s lip scrub recipe you can remedy chapped lips in time for Christmas!

This Christmas give your lips (or someone else’s!) the gift that keeps on giving with a super quick homemade lip scrub.
You will need:
- A small bowl
- A spoon
- Sugar (you can use caster, golden caster or brown sugar)
- A base oil like coconut, almond, olive or jojoba oil.
To make the lip scrub in the picture, I’ve used golden caster sugar and jojoba oil. How much you make will be dependent on the size of your container.
Once you’ve decided on that, mix your sugar and base oil and then transfer into your container. It’s that easy! If you want something extra moisturising then you can add a bit of honey. Or you can add colour additives to give the scrub a bit of pop! To use, scoop a bit out on your finger, scrub your lips in a circular motion, wipe off the excess and voila! Lips as soft as clouds and ready to be kissed (by those in your bubble, of course!)
Mulled Wine
Many of us will miss the atmosphere and festivities the markets bring this year but we can always bring some aspect of it back into our homes this Christmas.
For many celebrations, wine is always a natural pairing. At Christmas, wine is heated and infused with spices, citrus and sugar transforming it into our favourite holiday drink – mulled wine. Combine orange, cinnamon, cloves, nutmeg, sugar and red wine over a simmer and enjoy!
