

Every Christmas we hear about the hottest selling toys but what happens to the toys children no longer want? If you’re not going to donate them, why not help cut down on plastic waste and breathe new life into old toys by repurposing plastic figures? Perhaps you’ll create a new holiday tradition and some new family heirlooms in the process!

You will need:
- Plastic animals, dinosaurs or other toy figures
- Screw eyes. I used some small screw eyes from a hardware store, measuring roughly 12mm in height with the ‘eye’ measuring around 5mm across. You can buy smaller screw eyes, which
- Twine
- Ribbon (optional)
- Split rings or jump rings (optional)
- Scissors
- Hot glue gun and glue sticks (optional)
- Crimping shears (optional)

Step one:
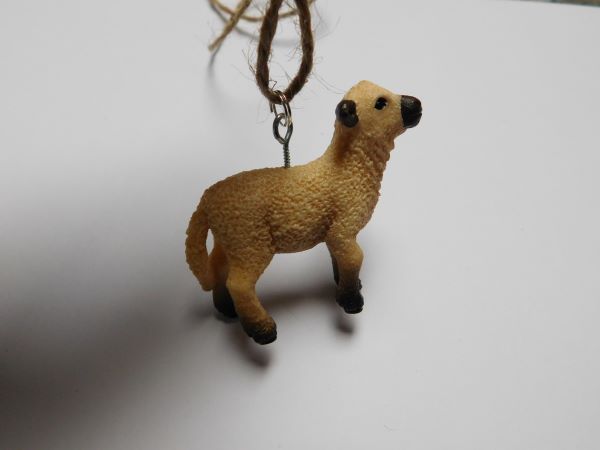
First you’ll want to find the centre of balance for the figure you’re going to turn into a decoration. Hold it gently between your index finger and thumb and tilt it back and forth to see whether it is more front heavy or back heavy. The figures I used are made from a fairly hard plastic, so I used screw eyes from a hardware shop rather than the more delicate kind that are often used for jewellery making.
You’ll want to position your screw eye closer to the neck on animal or dinosaur figures that are more front heavy in order to prevent your decoration from looking wonky when you go to hang it up. The reverse is the case for figures that are heavier toward the rear. For other figures, you may find that the centre of balance is almost right in the centre.

Step two:
Once you have found out whether the figure you are using is heavier toward the front or rear etc., gently position your screw eye accordingly and screw it into the figure a couple of millimetres deep. This will allow you to test the placement of the screw eye. I find that it is easier to insert the screw eye into the figure with a split ring or jump ring attached to the ‘eye’ of the screw, as it provides a better surface to grip with the smaller screw eyes.
Step three:
When you have inserted the screw eye just a couple of millimetres into the figure, try threading some twine through the ‘eye’ of the screw or you can thread it through the split ring or jump ring attached to the screw (if you have used a split ring or jump ring).
Step four:
Gently dangle your figure using the twine to get an idea how it will hang on a tree or wherever you are going to place your decoration.
If you are not happy with how the figure is going to gang, reposition the screw eye and try again.
Step five:
Once you are happy with the placement of the screw eye, continue to screw it into the figure in order to provide something secure for your decoration to dangle from.
If you don’t want to add any embellishments to your decoration, you’re all done!

Step six (optional):
I opted to give my animal decorations little scarves and bow ties. This is a good opportunity to use up some of your craft stash if you have any ribbon or card embellishments! Alternatively, if you have a stash of little cabochons and other supplies used for nail art; why not use some of those?
Tips:
Adding bows and little ‘bow ties’ may work better for figures of animals with manes, such as horses.
If you do wish to add embellishments, you may wish to do secure them using hot glue. You could also use a little bit of Zap Jewellery Gel (which is slow to dry, so you don’t have to worry about sticking your fingers together!) or an own brand, all purpose clear drying glue. Please be aware that Zap Jewellery Gel tends to dry more white than clear when you are gluing ribbons and bows to plastic (yes, I have used it in the past!)
Hot glue is a good adhesive to use if you’re a bit indecisive about how you want your decorations to look or you’re not happy with the idea of using and adhesive which is harder to get off and therefore more permanent.

Scarves:
If you want to give your decorations little scarves, simply cut off a length of ribbon, fold it in half and then thread the ends through the loop in the middle of your ribbon in the same way you might loop a scarf around your neck. You can then pop it over the head of your figure or you can just loop the ribbon around the neck or your figure and then fasten it. Whichever method you find easiest.

You may want to trim the ends of the ribbon with crimping shears in order to try to prevent further fraying.
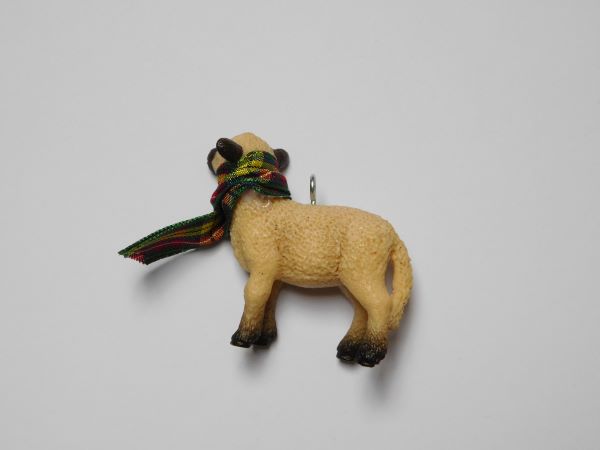
Originally I wasn’t going to secure the ‘scarves’ to the figures I used but in the end I found that it was better to secure them by putting a small dot of hot glue on the necks of the figures, just underneath the ribbon.
Bow ties:
For the ‘bow ties’, I simply glued some little bow card embellishments onto the figures using hot glue.
Other ideas:
You don’t have to just use your figures as hanging decorations. You could simply use the figures in terrariums and little fairy gardens if you’re not comfortable with inserting a screw eye into them. Some smaller figures might be suitable to use as bag charms or even pendants!
I quite like the look of the necklaces made with little porcelain animal figures that you can find in some stores but I’ve never bought one. I’m quite clumsy and it would therefore probably not last very long in my possession! Using an unwanted little plastic animal figure provides a cheaper and more durable alternative as a pendant and the finished product could be a great gift for little ones or adults who have a more quirky taste in accessories!
Enjoy! – Steph
